The concept
This chapter describes the concept behind SeqZap as well as the conceptual terms used in the program.
Why use SeqZap?
SeqZap is specifically designed as a professional tool for automated testing of embedded software. SeqZap is generally used to automate the execution of both functional tests of computer-controlled systems as well as other tests, such as performance-test.
It is therefore not necessary for each individual company to develop and maintain its own automation software. Instead, the company can use SeqZap and make use of the timesaving functions, which many other companies have contributed to maturing and improving.
Take control of your testing process
There are several reasons for using a program such as SeqZap for automated testing:
Save time and money when you execute the same test again and again
Anyone can execute the test simply by pressing one key
You are certain that all steps will be executed every time – people tend to forget
Some things cannot be tested manually, for example when:
A test demands many repetitions
A test is running over a longer period
A high precision between the repetitions is needed
You have a large amount of test data
You have complex test data or test logic
With automated testing you will have both a broader and a wider spectrum of tests
The complete test or a selection of tests can be carried out as often as necessary; several of our customers are for example running their tests every night.
Automation without experience in programming
As a developer, tester or technician you will benefit greatly from both automating your own tests and executing tests made by others.
With SeqZap it is now possible for everyone in one project to use the same tool, which is a great advantage for both the team and the company.
SeqZap is the perfect tool for automation of tests:
Test of software systems SeqZap can be used through the entire development process for continuous testing of the software.
Test of hardware SeqZap can be used with all kinds of instruments (either as standard solution or developed for a specific solution), and it is therefore a perfect tool for automating measurements and tests.
Test bench SeqZap is very suitable for test benches where one or more instruments are used to make a number of measurements and tests of electronic devices and/or software systems.
Ad-hoc automation Basically SeqZap is a general automation tool and can be used to automate several different measuring and instrumenting tasks.
You can therefore execute several different tests using the same tool. SeqZap is not only a very useful standard tool for testing, but also a very flexible tool with numerous possibilities for expansion, which makes it a perfect framework to solve specific tasks.
Description and terminology
This section describes how a complete test set-up looks like, what it consists of and how the different components influence each other.
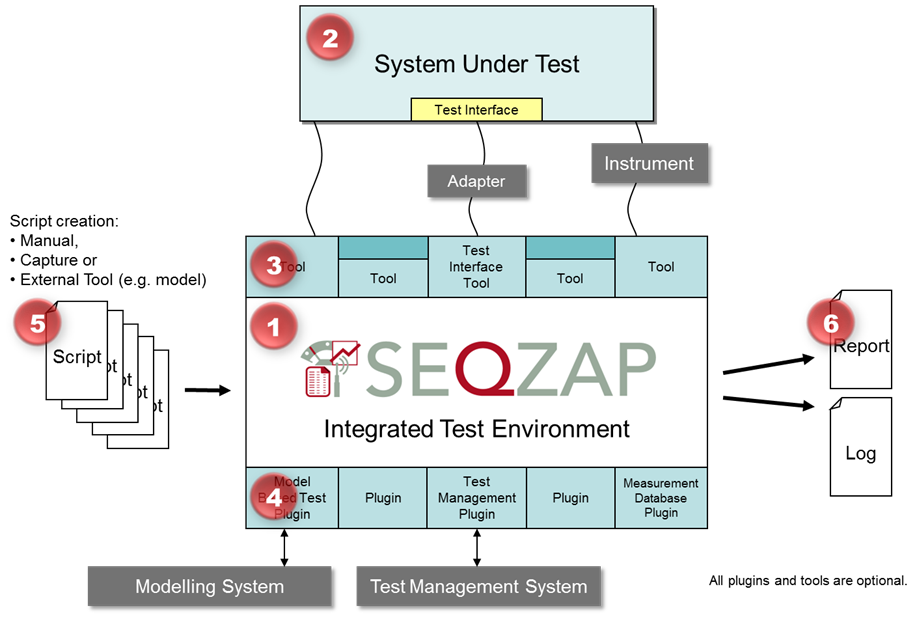
1 SeqZap’s Integrated Test Environment (ITE). 2 The system under test 3 Communication layers enabling the communication with your system through add-ins. 4 Administrative layers enabling adaptation of the test environment. 5 Scripts specifying how your test should to be carried out. 6 The test results are saved in both an overview report and a more technical log file.
Test Environment
The test environment or the ITE is the core of the SeqZap. This is where you can write and execute your tests. As shown in the above illustration, SeqZap is a very open and flexible system. Our integrated test environment (ITE) is connected to the system that you want to test. This system, also known as System Under Test or SUT, can be both hardware based with embedded software or regular software running on a PC.
The test environment is further described in the chapter User Interface
Communication layers
The communication layers between our ITE and your SUT consist of a number of add-ins of standard or specially developed tools, ZapTools, which makes it possible to communicate with your system – either directly, through an adapter, and/or by reading one or more instruments.
Administrative layers
On the internal side of our ITE you can adapt the test environment in SeqZap and thereby integrate it with other test environments and test administration systems. This means that you can integrate SeqZap with different data files for storage of in- and output for your tests.
To run your tests, you need one or more script files specifying the tests that you want to run on your SUT. These script files can be developed in a number of different ways which you can read about later in this guide.
After the test, SeqZap will generate a test report that highlights the results for all tests carried out in a specific configuration and version. SeqZap will also generate a more technical log file that documents the entire testing process.
Script-files
The description and specification of your test is saved in one or more script files. In SeqZap these can be created in the following ways:
Manually by writing them down yourself starting from scratch through the built-in editor.
By recording the test sequences and converting them to procedure steps that you can execute later.
By importing script files from other file types or systems.
A script file consists of several different elements where the most important ones are procedures, test cases and test suits. If you have several script files for the same test, you can collect the script files in an overall project.
Script files, projects and their content are further described in the chapter Script files.
Procedures
A procedure is one of the foundations in a script file and consists of a set of instructions. These instructions can be different forms of procedure steps, hereunder expressions and various forms of loop- and conditional structures, parameters for the procedure, management of models, documentation on different levels and handling errors.
There are different types of procedure steps available in SeqZap and every type has its own unique functionality.
Test cases and test suites
A test case is a procedure, which is set to be a test case and thereby controlling all underlying procedures, whereas a test suite is a collection of test cases.
Workbench
A workbench is a working area where you have access to setting up different tools (instruments, protocols, means of communication etc.). This function is a unique and very used function, but it will not be explained further in this booklet.
Report and log
SeqZap saves the results of your tests in both a report and in a log file. The report is the general overview of your test, whereas the log file contains a detailed overview of all the actions taking place during the test.
Test results
When you execute tests through SeqZap you are of course interested in the results of the test. To get the results you use the data type Verdict, and the results of your test can have one of the following values or verdicts:
UNSET (grey), means that the test is completed but with no test result.
PASS (green), means that the test is completed with a satisfying result and lies within the expected values in terms of specification of requirements.
FAIL (red), means that the expectations of the test were not met and that the result lies outside of the specification of requirements.
INCONCLUSIVE (yellow), means that the test has not generated sufficient data to provide you with a result (occurs rarely).
ERROR (yellow), means that there is an error in your test-setup or test environment.
It is important to distinguish between the different results and especially the difference between FAIL and ERROR. You will receive the value FAIL when your SUT does not return the value that is expected and therefore does not reply as expected, whereas you will receive the value ERROR when your test cannot be completed due to an error. An error can be due to different things such as communication failure with your SUT, internal failures in your script file or in SeqZap, or different preconditions for your test are not in place.
User interface
Let us begin this chapter with creating a very simple script file, which we will use to describe the user interface of the program.
The SeqZap user interface
Creating a new script file
If you want to create a new script file you need to follow the steps below:
Select the command File ▶ New ▶ Script File (or press Ctrl + N).
Type a name for the file in the text box File name.
Under Location for new file you need to choose where you want to save the file. This is done by first selecting Base and thereafter selecting the folder by clicking on Browse.
Creating a new script file.
Click on Create.
You have now created a script file – in the example above I have saved it in a new folder called SeqZap under Documents.
Views and panels
SeqZap’s user interface is divided in different views and panels. To avoid losing the overview you can secure the views in groups and thereby change between the different views by clicking on the specific tab in the group.
Panels are interactive displays with information from your toolbar. We will get back to this later.
You can change the size of the windows by pulling in the window frame using the mouse. If you double-click on a tab the window is released from the group as a separate window that you can place anywhere on your screen since the window can be placed outside of the program window (you can also simply pull in the window tab and place the window wherever you want it to be).
By default, the following four windows are shown:
- Execution State.
- Document Window.
- Properties.
- Execution Log.
The active window will be marked with a blue bar (this rule does not count for the document window).
You can change between the different windows by clicking on their panels or select them in the menu View, where you can also find closed windows.
The Execution state window
The Execution State window is used to show the current status of the procedure that you are running right now as well as part of the final result after the procedure is finished.
This shows the windows File Explorer, Execution State, Active Tools and Capture Control collected in one group.
In the top of the window you will find a small bar with debug controls where you will have the possibility of playing the active test suite or procedure in different ways:
Execute the entire active test suite or procedure.
Pause the active test suite or procedure.
Stops the execution of the active test suite or procedure.
Runs the active test suite or procedure step-by-step.
The document window
The document window holds the script file and thereby the window where you set-up and edit your script file by using SeqZap’s editor.
You can have several script-files open at the same time, each of which has their own tab. If you have more script files open than there is room for, you have the option of using the backward/forward controls to the right of the document tabs to browse the different documents.
The properties window
The Properties window shows the characteristics of the object that you have marked in the primary document window as well as some of the other windows. If you for example insert a step that delays your procedure, you will have the possibility of indicating how long this delay should be in the Properties window.
The Execution log window
The Execution Log window shows a dynamic incident-log over the current execution, which enables you to see which steps are currently run.
The Errors and warnings window
In the Errors and Warnings window, which you will see as a standard window to right of the Execution Log window, you are able to get an overview of possible errors in the compositions of the script – a type of spell check.
SeqZap activates the window automatically if any error occurs. There is a further description of this feature in the Procedure Call chapter.
An example
Lets try to do an example in order for you to get to know the windows a little better.
This implies that you already have created a script file as previously described in the above.
Creating a new procedure
Lets begin by creating a new procedure.
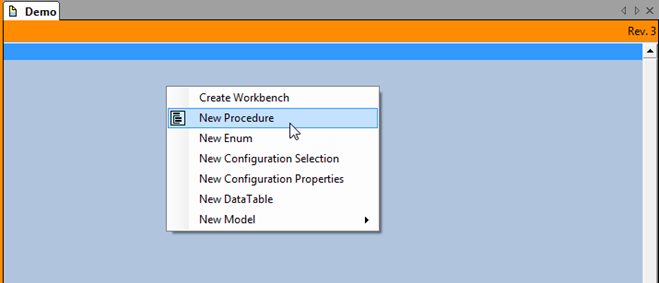
Right-click on the document window and select New Procedure.
Creating a new procedure.
The procedure is now created and you can indicate which characteristics the procedure should have.
Click in the field Name in the Properties window and type a suitable name for the procedure.
General properties for a new procedure.
You can choose to type a brief description of the purpose of this procedure in the field Procedure Purpose.
Uncheck Has Verdict if you do not want a verdict.
The check box Has Verdict is used to decide if the procedure should end up with one of the previously described verdicts. Most of the procedures usually end up with a verdict but there may be times where you wish to leave this out, in this case just remove the checkmark in the box.
Below in the properties window, you can decide how you want the procedure to act in case any errors occur.
Check the box Skip rest on Step Fail if you want to interrupt the procedure in case you get the value FAIL in your test.
Check the box Goto Cleanup on Error, if you want to have your test to move to a more defined place in your test in case of any test errors (for example by turning off a pump, closing a valve or closing the connection to a database).
If you check that box, remember to insert an equivalent Clean-up label in your procedure.
You have now indicated the characteristics for the procedure. The next step is to insert one or more procedure steps in the procedure.
Right-click in the documents window and select the command Insert Step in the shortcut menu.
Hereafter you need to select the type of procedure step that you want to insert.
Select for example the command Comment in the shortcut menu in order to insert a comment in the top of the procedure.
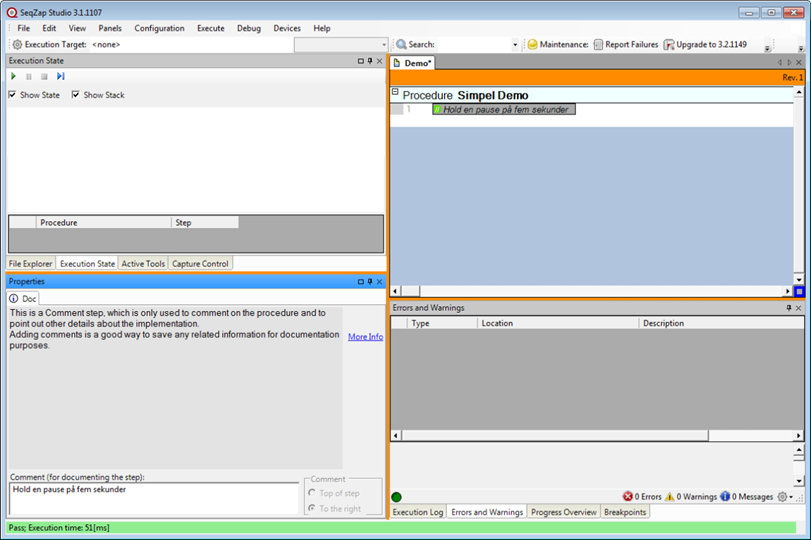
The indication of the comment in the procedure will be displayed here.
SeqZap inserts an indication of the comment // and an input field in your document. You can type the comment either directly in the input field in the document or by typing the comment in the Properties window.
Most procedure steps consist of one or more fields that you can edit separately.
You could for example type "Take a five-minute break".
Type the comment either directly in the document window or use the properties window.
If you wish to edit the text, you need to click on it and use the regular edit- and navigation keys to mark and edit.
If you prefer using the keyboard instead of the mouse, you can press F2 to edit the content in a field. You may recognize this function from Microsoft Excel.
Right-click on the line below our comment and select the command Insert Step ▶ Delay in the shortcut menu.
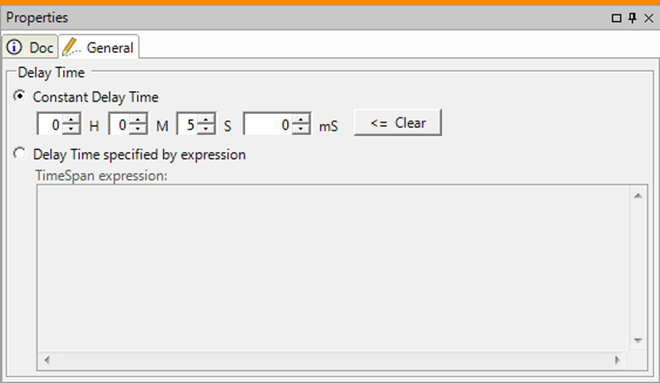
A delay, which by default will last half of a second (500 milliseconds).
You can change the duration of the delay in the Properties window. Here you can either choose to indicate a time value in the numeric fields under Constant Delay Time or you can choose to type an expression in the field Delay Time specified by expression.
Properties for the delay-step.
Type either 5000 in the field ms or type 5 in the field s and 0 in the field ms.
Running a procedure
Now we will try to run a procedure, which can be done in different ways:
Double-click on the procedure header.
Right-click on the procedure header, and select the command Execute in the shortcut menu.
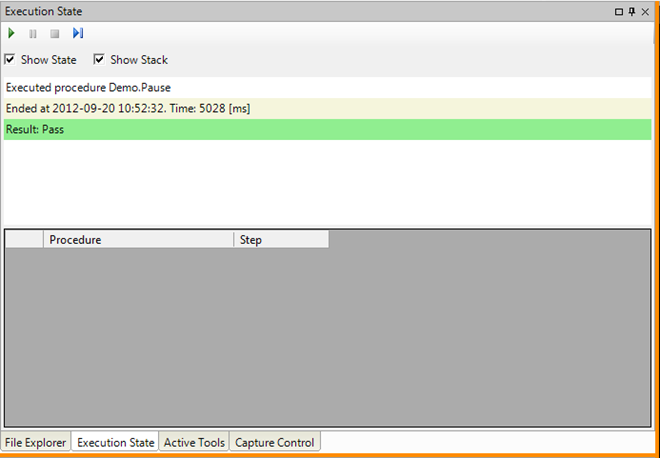
Click on play/execute in the window Execution State.
The window Execution State.
Press F5 – this will only work if you have indicated that the current procedure is a standard procedure, this is done by right-clicking the procedure header and select the command Execute by default (then a small F5 label appears to the right of the name of the procedure in the procedure header).
If your procedure has arguments you can only call it via a procedure call since you have to indicate one or more argument values.
The following will take place:
The script-file is prepared for the execution.
The procedure is carried out.
The window Execution State will show you the process during the execution of your procedure (you can repeat the above steps to see it again).
The execution will finish after five seconds.
If you have a delay of less than 2 seconds, a progress bar indicating the delay, will not appear. If you have a delay of less than 5 seconds, the Skip button, which can be used to interrupt the delay, will not appear either.
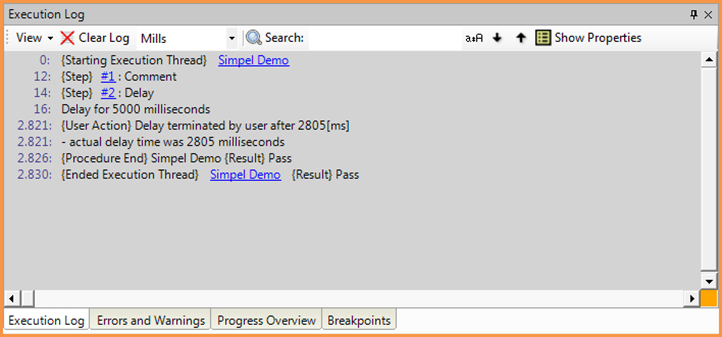
The window Execution Log, which shows the course and the result of your procedure.
You can view the detailed course and the result of your procedure in the window Execution Log – in the above example the user has clicked the Skip control after 2.805 ms and the result is Pass.
You can open the log window by selecting the command View ▶ Execution Log.
When you use SeqZap to automate your tests, it is of course important that you get a result from your script-file to check if your expectations to the tests were met.
You can view the result of your test in three different places in SeqZap:
In the window Execution State.
In the status line at the bottom of SeqZap.
In the window Execution Log.
In the test report (when running test suites).
Procedures without a verdict
Not all procedures results in a verdict. If the purpose of the procedure is to perform a simple task or to make an estimate, there is in fact no need for it to give a verdict.
Try for example the following:
Mark the procedure header, in case this is not already active.
Uncheck the box Has Verdict on the tab General in the Properties window.
Execute the same procedure again and notice that the result is now Unset.
Creation of several procedures
Often it is both an advantage and a necessity to create several procedures in order to make a complete test-script. Each procedure will have its own specific functionality and in order for everything to work in a structured manner it is necessary to call one procedure from another procedure.
Lets try to create a new procedure called Simple Demo:
Right-click on the procedure header for your procedure and select the command New Procedure in the shortcut menu.
This way the procedure is created with the name MyProcedure.
Rename the procedure to Main Program by typing it in the field Name in the Properties window.
Run the new procedure by double-clicking on the procedure header.
Since you have created an empty procedure, no action will take place so far.
Right-click on the white line below the procedure header for our procedure and select the command Insert Step ▶ Procedure Call.
The General tab in the properties window.
Hereafter you select the procedure that you want in the General tab in the properties window.
Select for example the procedure called Simpel Demo in the drop-down menu Procedure.
Notice that the name of your script file will be used as a prefix for the name of the procedure (actually as a namespace, if you want to use the more technical term).
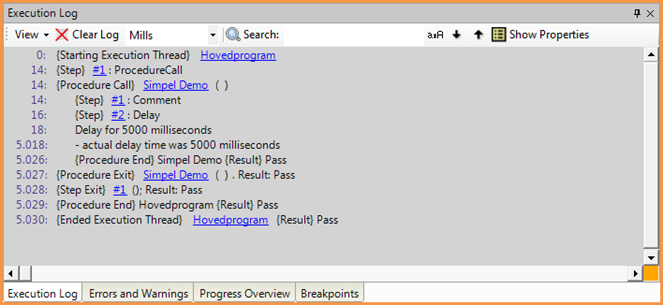
You can see the complete course of the program in the Execution Log window.
Double-click on the procedure header in your main program and notice that your procedure is now called Simpel Demo by the main program. After execution it will return to the main program, which is then closed down.
In connection with the call, you have the possibility of indicating whether this should take place directly (default) or with the help of a partner (See the Partners chapter in the Script files section for more information on the partner term).
Procedure with arguments
If you want to create arguments for your procedures, following the steps below:
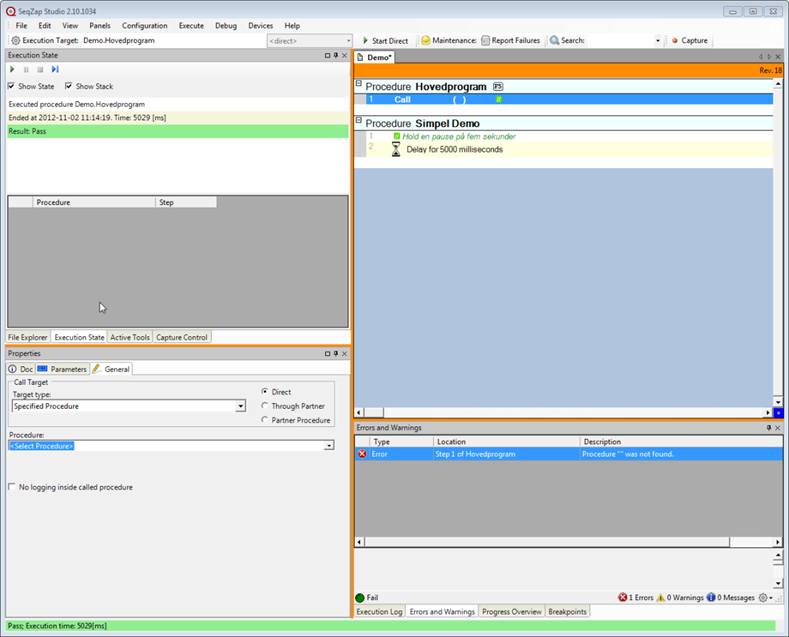
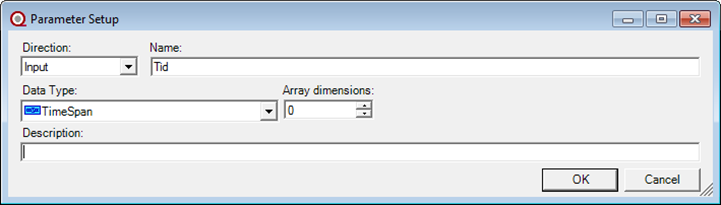
In the procedure header, click on the procedure that you want to have an argument – in this case the procedure Simpel Demo that we want to change and therefore need to transfer the time of delay as an argument.
Click on the tab Parameters in the Properties window.
Click on Add.
Creating of a parameter.
Type a suitable name in the field Name – for example the word Time.
Select a suitable data type in the field Data Type – in this case we select the data type TimeSpan that is suitable for time units.
Click on OK.
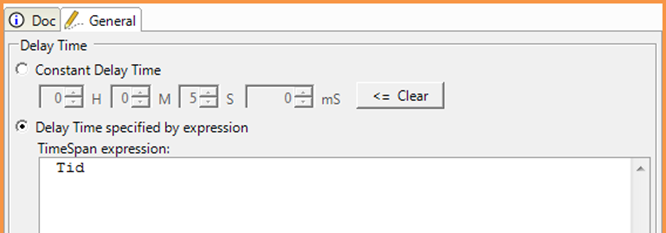
Now click on line 2 in the procedure; Delay for 5000 milliseconds.
Mark Delay Time specified by expression in the tab General in the properties window. Type the name of your argument, in this case Time, in the expression editor.
The argument name should be types in the expression editor,
After this, we need to indicate the argument value in connection with the actual call.
Click on line 1 in your main program, Call Demo.Simpel Demo, and hereafter on the tab Parameters in the properties window.
You could also delete the procedure call and recreate it – but there is also another way.
To do this, we first need to synchronise the arguments so that single procedures are aware of the arguments belonging to other procedures.
Click on the tab Errors and Warnings, and hereafter on the control Synchronise Parameters.
The tab Errors and Warnings contains an overview of the errors which are relevant in your test definition right now, for more on this see the chapter Step by Step.
If you are not able to view this tab, you can have it displayed by selecting the command View ▶ Errors and Warnings.
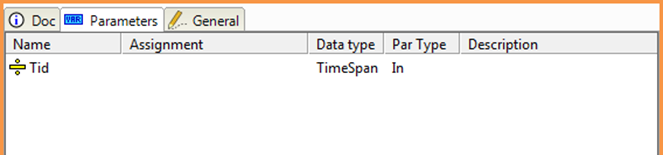
Click on line 1 in your main program, Call Demo.Simpel Demo, and hereafter on the tab Parameters in the properties window.
The tab Parameters in the properties window.
You are now able to view the argument Time, and now all we have to do is to give it a value.
Double-click on the argument Time in the tab Parameters.
Type the value 2500 in the field Value, and click on OK.
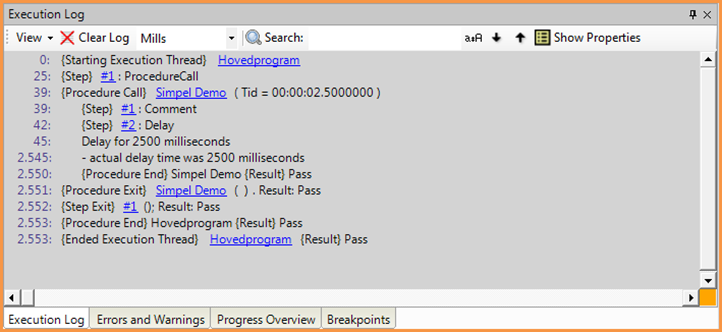
You can view your transfer of arguments in the tab Execution Log.
Double-click the procedure header for your main program to execute the procedure where the delay time is set as an argument.
You have now tried to create procedures and make transfers of arguments with the main purpose of getting to know the user interface.
In the next chapter we will go through some of the procedure steps in SeqZap so that you can get an impression of how these are used in a script file.
Step by Step
Procedure Steps
In this chapter we will go through some of SeqZap’s most used procedure steps. The procedure steps are used to control the execution of your procedures. This is done through procedure calls, declarations of variables, program expressions, expectations to the test, different forms of control of the process etc.
As previously mentioned, you will in SeqZap also use other tools. These will be described further at the end of this chapter.
In the examples below we will only go through the specific steps in each section, why we expect of you to already have created a procedure at this time.
Procedure Call
This step of the procedure is used to call another procedure with, as described previously in the example in the chapter User Interface.
You insert a procedure call in an already existing procedure in the following way:
Right-click on the line in your procedure where you wish to insert a procedure call and select the command Insert Step ▶ Procedure Call in the shortcut menu.
- Hereafter, you select the procedure that you want to call on the tab General in the properties window.
For the experienced user
Instead of always using the properties window to indicate different properties for each step of the procedure, you can often simply choose or type the most used properties directly in the document window, also called direct editing.
When inserting a procedure call, you can for example type or choose the name of the procedure that you want to call and/or give a comment to the call. This is done in the following way:
Right-click on the line in your procedure call where you wish to insert a procedure call and select the command Insert Step ▶ Procedure Call in the shortcut menu.
Here the inserted line with the procedure call is selected
Click on the right arrow and the field Procedure becomes active.
The field procedure is displayed as an active field in the document window.Press F2 to open the field. You can now begin typing the name of the procedure or press Alt+Down and Enter to select the procedure that you wish to call.
If you are an experienced user, you may notice that the name of the procedure is shown as namespace.procedurename. You can read more about the term namespace in chapter 5, Script files.
Click the right arrow to jump to the comment field at the far right on the line. Type a comment for the procedure call and finish by pressing Enter.
If you wish to edit one of the fields in the line, you simply mark the field again and press F2.
Errors and warnings
As previously mentioned, you can keep track of the errors in your script file in the window Errors and Warnings.
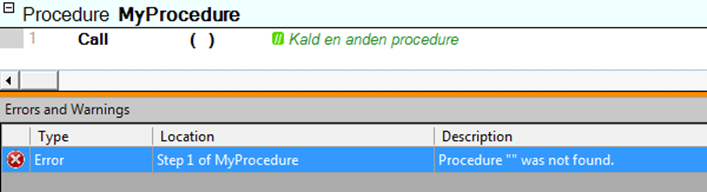
Try for example to insert a procedure call in your procedure without indicating which procedure you wish to call.
The window Errors and Warnings shows that you need to indicate a procedure in your procedure call.
If you have the window Errors and Warnings visible on the screen it will immediately show that you are missing an indication of which procedure to call. If the window is not visible, you can either try to click on the tab Errors and Warnings to show the error or you can try to execute your procedure after which SeqZap will show a box with an error message and activate the tab itself to show the error.
Double-click on the actual error message in the window Errors and Warnings to jump directly to the relevant line in your script file.
Type or select a name for the procedure in your procedure call and notice how the error message disappears from the window.
Local Variable
This step in the procedure is used to define (declare) a local variable. You can use local variables to store values in and then either use their values in the rest of the procedure or use them when determining if your test succeeded or not.
Right-click on the line in your procedure where you wish to define a variable and select the command Insert Step ▶ Local variable and select the type of variable that you would like in the shortcut menu.
When you create a variable it is automatically given an initial value which is typically 0 for numerical variables and the value FALSE for boolean variables. Text strings are by default empty.
You can read more about the different types of variables and data in the Data Types section of the appendix.
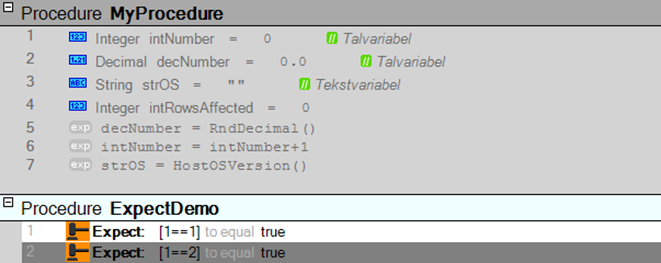
A newly created integer variable, renamed to intNumber.
After this you can use the General tab in the properties window to give the variable a suitable name, change the data type or change the initially assigned value.
Instead of having to change to the properties window, you can instead type the name of the variable, assign the initial value and type a comment for the variable directly in the document window, in the same way as explained in the section For the experienced user
Expression
In all programming languages you are able to type expressions called expression steps. These are used to assign values to variables or do calculations or evaluations by using different comparison operators. In SeqZap we have gone one step further so that you can actually perform actions by using the steps of expression.
Right-click on the line in the procedure in which you wish to insert an expression step and select the command Insert Step ▶ Expression in the shortcut menu.
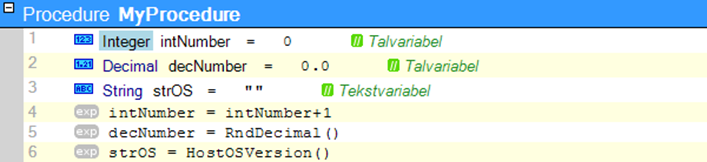
Line 4-7 show examples of expressions of different types.
Type the expression in the properties window or directly in the line.
Select the command View ▶ Expression Identifiers to get an overview and an explanation of the different functions that you can use in your expressions.
Expect
When you make a test, you may of course have different expectations to the result of your test. This could for example be that you expect a numeric or a boolean value from a variable, a device, an instrument or a switch.
In SeqZap you will find the two steps Expect Boolean and Expect Numeric, which expect respectively a boolean and a numeric value.
Right-click on the line in your procedure where you wish to insert an expectation step and select for example the command Insert Step ▶ Expect Boolean in the shortcut menu.
The above is an example of a very simple test expectation in the document window.
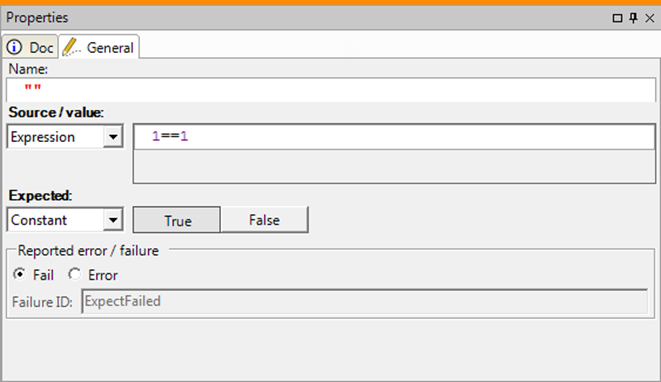
Type the properties for your expectation in the properties window as shown in the figure below.
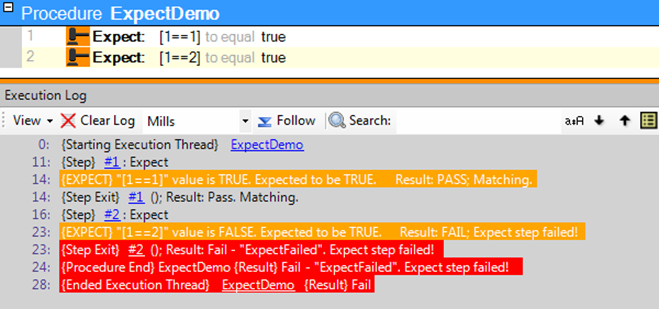
In the very simple example shown, it is tested whether 1 equals 1, which is hopefully the case. We also expect that the result of the expression 1==1 equals TRUE which means that the test is going well and that the procedure would respond with a FAIL if this was not the case.
Notice that you in SeqZap, as in other high-level languages such as C++ and C#, type two equals signs to make a comparison and that a single equals sign is used to assign a value to for example a variable.
An example of a very simple test expectation in the properties window.
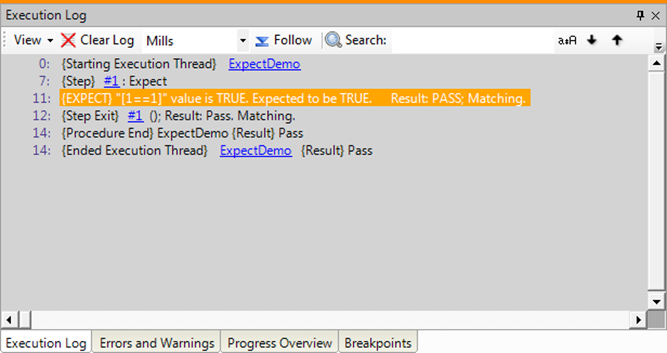
Double-click on the procedure header to run the procedure.
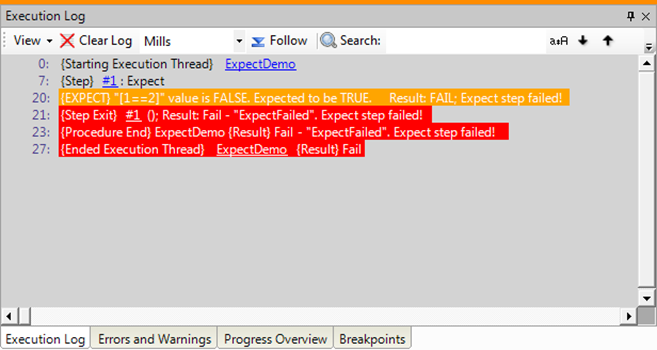
The result of the test is shown, among other places, in the execution log – in the above example the test was carried out as expected.
As you can see on the tab Execution Log the test result matched our expectations and therefore the test gives the result PASS. This is visible both in the actual execution log and because a green bar is shown with the text Pass in the window Execution State and in the status line in SeqZap.
Now try to change the expression to 1==2 in the properties window and execute your procedure again.
Since 1 does not equal 2, the test should fail, which you can also see in the three before mentioned places i.e. the execution log, the Execution State window and in the status line where the green bar is now replaced by a red one.
The result of the test is, among other places, shown in the execution log – here the result was as expected.
If you have several expectations in the same procedure, the procedure will fail if just one of these expectations is not met.
Two different expectations in the same procedure.Try for example to insert an expression of expectations as shown in the figure above and run your procedure after that.
Regardless of the order of the above steps, the procedure as a whole will fail since there has been at least one FAIL result along the way.
Mark a line and press Alt+Up or Alt+Down, if you wish to move the current line up or down in your procedure to change the order of the lines in the procedure.
You can also use the step Set Verdict to directly indicate one of test results Inconclusive, Fail or Error.
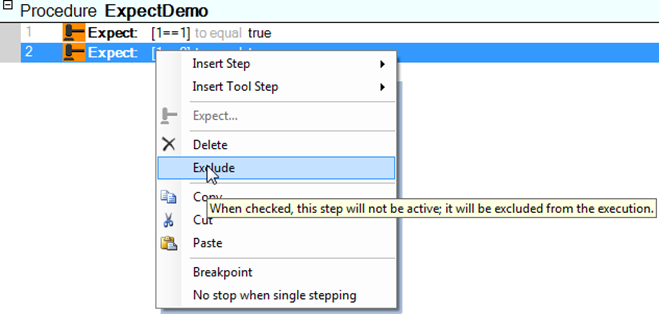
Leaving out selected lines and procedures
Sometimes it can be an advantage if you - usually temporarily - can leave out one or more lines from your procedures or even the entire procedure from your script files. Instead of deleting the line or the procedure and then retyping it later, you can exclude it from being executed.
This can be done in the following way:
Right-click on the line or in the procedure header for the procedure that you wish to exclude (if you want to exclude multiple lines, you must first select them and then right-click on one of the selected lines).
Excluding a line from running in a procedure.
Select the command Exclude or Exclude Procedure to exclude one or more lines or a procedure in your script file from being run.
Notice that the excluded lines and procedures are displayed with a grey background, just as you will see a checkmark next to the command Exclude or Exclude Procedure in the shortcut menu.
Right-click on a line or a procedure header, and select the command Exclude or Exclude Procedure again to reactivate one or more lines or a procedure so that it again is included in the execution of your script file.
Flow Control
It can often be both beneficial and necessary that you are able to check the progress of your procedures in a structured way. As in all other forms of logic and programming, we distinguish in SeqZap between conditional structures and loop structures.
A conditional structure is used to make choices, for example if a variable has a certain value, if a switch is on or off, if a measurement exceeds a certain value etc., while a loop structure is used to repeat all or part of your procedure until a certain condition is met one or a specified number of times.
Let us begin with an example of how to insert a conditional structure in a procedure in which the procedure must do one thing if it is a weekday and otherwise do something else:
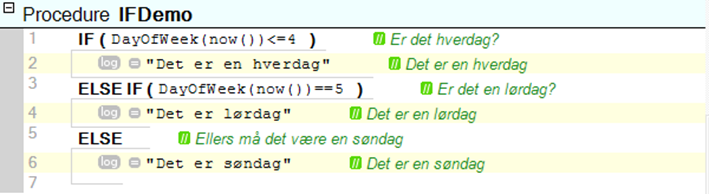
Right-click on the line where you wish to insert your al and select the command Insert Step ▶ Flow Control ▶ IF in the shortcut menu.
The beginning of a conditional structure.
SeqZap then inserts two lines in your procedure. The IF statement itself is the first part of the conditional structure and is used to define the condition to be used to direct you to the right place in the procedure, and since all structures have both a beginning and an end, the conditional structure will close with an END-step.
Remember that the condition should give the value TRUE or FALSE which is written through comparison operators such as ==, >, <, >=, <= and !=. The latter operator means different from, which you might know as <> in for example Microsoft Excel, but in SeqZap it is written as an exclamation mark and an equals sign. The reason for this is that we, as mentioned previously, follow the spelling of the high-level languages such as C++ and C#, where an exclamation mark means NOT, and != is thus read as not equal.
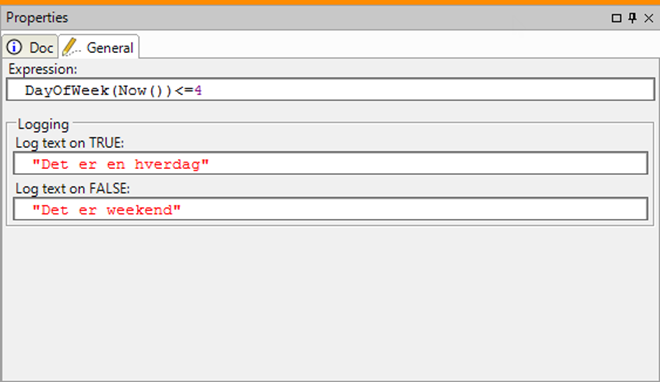
Type your condition either directly in the document window or by using the field Expression in the Properties window.
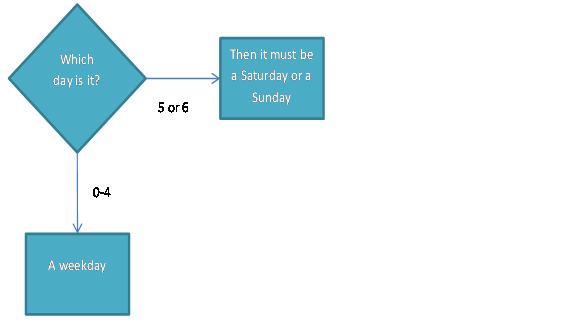
In this simple example we want to know what day it is, and then respond to whether it is a weekday or a weekend. We therefore use the function dayOfWeek (), which returns an integer number from 0-6 to tell what day it is. Day 0 is Monday and so forth, why day 5 and day 6 then are respectively Saturday and Sunday (we have assumed that if it is not a weekday, it must be a weekend).
Example of a very simple IF-condition.
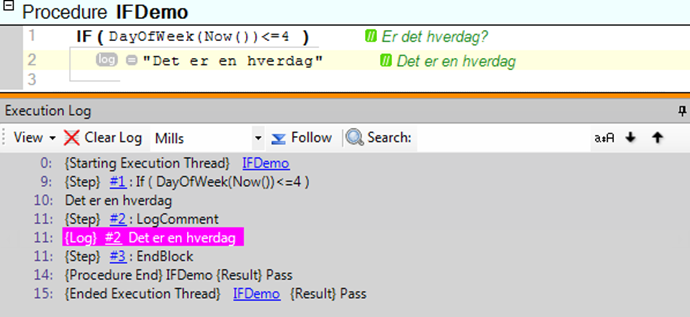
Notice that the fields Log text on TRUE and Log text on FALSE can write a text that, depending on the result of your condition, is written in your execution log but is not used in the actual procedure.
If you do not want to sit and wait for it to become weekend to see if the IF-condition is working, you can instead try to write DayOfWeek(DateTime(2013,01,05,12,00,00)) <= 4 as a condition (the date of the first Saturday of 2013). The function DateTime() is used to return a date from integer values respectively for the year, month, date, hour, minutes and seconds.
Right now, the procedure is not doing anything else besides running the IF-condition and checking what day it is, we must therefore add a few more steps to the conditional structure to see the results of the test.
Let us try to use a few Log Comment steps to illustrate, however we could easily also have used a call procedure or a Set Verdict step as an example.
Right-click on the line where you wish to insert a log comment - in this case line 2, which contains our END-step, and select the command Insert Step ▶ Log Comment in the shortcut menu.
Type the text that you want to have displayed in the execution log if the condition in the IF-comment evaluates to TRUE.
Remember that all text in SeqZap must be written in double quotation marks.
>The result is now displayed as a log-comment in the execution log.
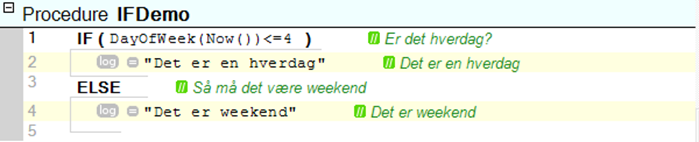
If you run this procedure during a weekend, nothing will be written to the log - unless you have specified this in the property sheet for the IF-condition. If you want your procedure to handle this itself, especially if certain steps are to be performed on the weekends, you need to add an ELSE step to your conditional structure.
Right-click on the last line in your conditional structure, in this case line 3, and select the command Insert Step ▶ Flow Control ▶ ELSE in the properties window.
If the condition in your conditional structure is TRUE, the procedure will skip line 2 and move on in your procedure.
Right-click again on the last line in your conditional structure and select the command Insert Step ▶ Log Comment in the shortcut menu to insert a comment in your execution log if the IF condition is evaluated to be FALSE.
Example of an IF-ELSE structure.
You have probably noticed that there also exists an ELSE IF step. You can use this to find out whether it is a Saturday or a Sunday instead of just knowing that it is weekend.
Right-click on the line where you wish to insert an additional condition in the same conditional structure, in this case line 3, and select the command Insert Step ▶ Flow Control ▶ ELSE IF in the properties menu.
Type the new condition in the ELSE IF-step the same way as in the IF condition.
Right-click on line 4 and select the command Insert Step ▶ Log Comment in the properties menu to insert a new log comment under the ELSE IF-step.
The finished condition structure.Adjust the test in the last log comment so that it fits into the logic of your conditional structure.
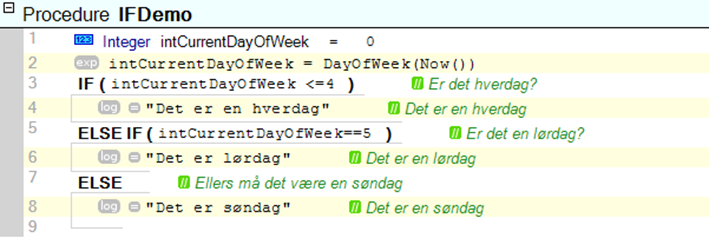
In this example, we do not exactly follow the so called best practice, since we ask for the same value twice – in this case by using the DayOfWeek() function. Partly because it takes time, although it is quite a short time, but worse is the fact that the value may have changed along the way. In this case, it could be that you have executed the procedure around midnight, but in other cases it could be that you asked for the value of a switch, a measurement or the like, and it has changed between the two queries.
It is best practice that you save the value of the measurement or the like in a variable, which you then can evaluate multiple times without it changing values along the way.
In SeqZap we also have a wide range of tool steps that you can insert in your test procedures. These tool steps are used to communicate with all kinds of hardware and software to automate different processes
It would be too extensive to describe all tool steps in this Getting Started Guide, so we will in the following only show one example of how to insert and apply a tool step.
Let us go through an example where you wish to check if there is the right number of files in a specific folder:
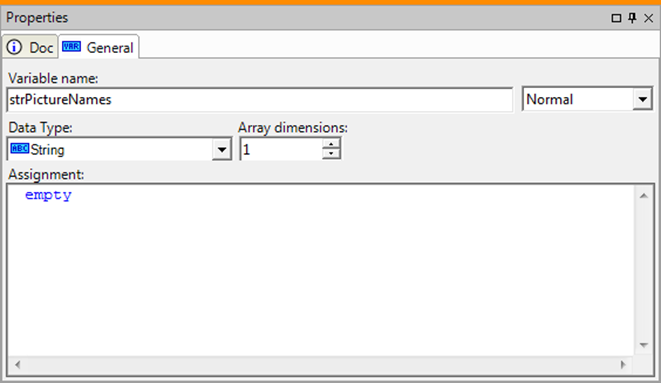
First of all you need to develop a new procedure with a string variable to save the folder names in.
Here the string variable strPictureNames is defined. The symbol on the left and the square parentheses show that this is an array-viable.
The variable must be defined as an array, which simply means that the variable can contain multiple values (we need to save all the file names in the variable so that we can later count how many file names we have).
The variable strPictureNames is here defined as a one-dimensional array.
Select 1 in the scale field Array dimensions to indicate that you want a one-dimensional array.
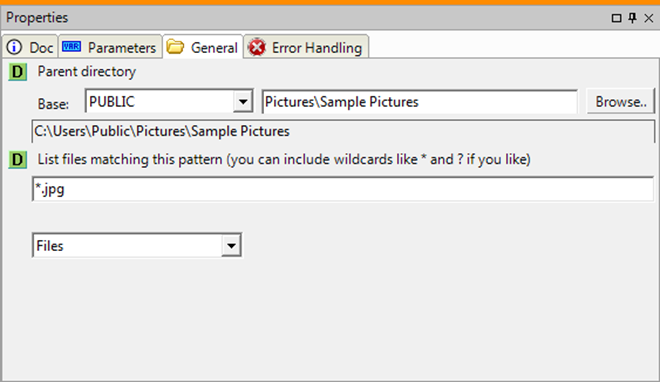
You can find all the jpg-files in the folder Sample Pictures under Pictures.
Right-click on the line where you wish to insert a tool step and select the command Insert Tool Step ▶ FileTool ▶ List files in the shortcut menu.
Choose the desired properties for the tool step in the properties window, as shown in the example above.
Click on the tab Parameters in the properties window.
The yellow minus shows that you have not yet assigned a variable to the result of the step.
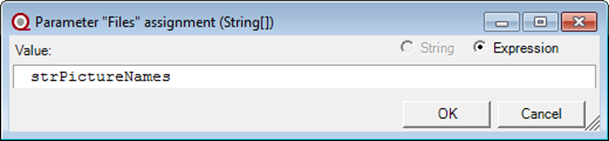
Double-click on the parameter Files to indicate where you want the file names to be placed when you execute the procedure.
Type the name of your variable in the field value.
The procedure is now almost finished.
Now all we need to do is to indicate our expectations to the test so that we can receive a verdict.
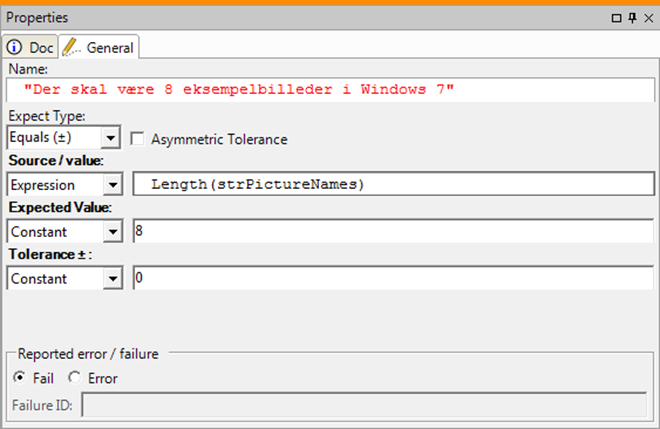
Right-click on the next line and select the command Step ▶ Expect Numeric in the properties window.
Properties for our Expect-step.
Indicate the properties for the Expect-step in the properties window.
The finished procedure.
In Windows 7 there are by default eight sample pictures, so we can try to verify whether this is the case here (if necessary, try to change the number if you have a different number of pictures or if you want to see what happens if the expectations are not met).
Double-click on the procedure header to finalise the procedure.
If you have eight pictures, you will get the verdict PASS – if not you will get the verdict FAIL.
Script files
A script file in SeqZap can contain different kinds of data, of which the most important are the ones we call file elements, for example procedures. See the chapter File elements.
In addition, a file can also have other data that relate to the use of the script file as well as relations to other files. When you select a script file in the File Explorer window, you can view and change the data in the properties window. There are for example properties for folder abstractions, file references, customised properties and extensions to the functionality of the file. These are described in the following section.
The normal name of the file type is szs, which stands for SeqZap Script.
The underlying file format for a script file is XML. The used XML formatting is made as readable as possible even if the user edits the file through the graphical editor in SeqZap Studio. It is a great advantage that the files are in a simple readable format when two versions of a file need to be compared in a textual 'diff-program', for example during version control/configuration management.
Namespace
Each script file has a so-called namespace. A namespace is a kind of prefix attached to all file elements in the file. This namespace allows you to see which file the referenced file item belongs to. In a Procedure Call step, for instance, you can see which namespace the referenced procedure belongs to. It is therefore also possible to have two file elements with the same name in each script file if the files have different namespaces.
File references
A script file may contain any number of file references. A file reference is used to specify which other files are necessary for the use of the current file.
Usually references are set up to other script files. By creating a file reference to another script file, the referenced script file is automatically opened by the SeqZap environment when the current file is opened.
The script files that the references are set up for will automatically become visible for the current file, which means that you from the current file can make use of the file elements that are in the referenced file. This does not work the other way around; the referenced file is not able to view the elements from the file that references it.
Project files
A project file is a normal script file with a project definition file element.
Here you can see the project definition as it looks like in a newly generated project file.
A project file is the main file in a project and has references to all other files in the project. A project file is not completely closed in SeqZap Studio before you select File ▶ Close All.
SeqZap Studio can only have one project open at a time. The files where the file references are set-up to from the project file are all considered part of the project. These files can all see each other's file elements, and therefore do not need to each have file references to other files.
In the example above file references to the files FileA.szs, FileB.szs og FileC.szs are inserted in the project file. From the project file and the files FileA.szs, FileB.szs and FileC.szs you are able to ‘view’ and call the procedures ProcX og ProcY. However, the procedure ProcZ is on the other hand only visible from FileC.szs and of course from FileD.szs. The procedures ProcX eller ProcY are not visible from FileD.szs.
File elements
A SeqZap script file can contain any number of elements, generally known as File items. The main types of items are as follows:
Procedures
Definitions
Data
Configuration Properties
Data Tables
Test cases
Test suites
Models
Procedure models
Data Table models
Workbench
The different types are described in the section below.
Procedures
The main function and purpose of a procedure is to perform a specific task by executing the steps that have been inserted. This is described in the chapter Procedure steps.
In SeqZap a procedure is not only a name, a number of parameters and a number of code lines. There are also many other data that can be connected to each procedure.
| Procedure data |
|---|
| Name |
| Description |
| Purpose |
| Model reference |
| Parameters |
| Partners |
| Custom defined properties |
| Procedure-steps |
| Use of configuration properties |
| Settings for error handling |
A procedure contains several different data.
Procedure name
A procedure name can include letters, numbers, spaces, and a variety of different special characters.
Description
The description field is used to document the procedure.
Purpose
The purpose is designed for a short one-line description of the purpose of the procedure. If this description has been filled-out, it will be shown in the window Execution State under execution.
Model reference
The model reference for a procedure is used to connect the procedure to a procedure model, a general model for the parameters, partners and custom properties that the procedure should have. For more information see the chapter Procedure Models.
Parametres
Procedure parameters are used to transfer arguments/values to a procedure to be used during execution.
Parameters cannot be used as input to the procedure, but can be used to return values to the procedure that is calling the current procedure.
| Parameter direction |
|---|
| Input | Value transferred to the procedure that is called |
Input by Reference
(for advanced users) | A reference to the input value is transferred to the called procedure. Used to prevent copying of large quantities of data. |
| In / Out | |
| Output | |
| Return | |
The different directions for each parameter can be seen in the above table.
The data type for parameters can be any of the supported data types. See the Data Types chapter in the appendix.
If a parameter (or a variable) needs to represent multiple values, you can set the Array dimensions to the number of dimensions that make up the value.
An array can be seen as a type of table. If Array dimensions are set to 1 it will be a one-dimensional array, which is a list of values (a single sequence of values). If the value 2 is selected, it will be a two-dimensional array.
Partners
Partners are described in the chapter Partners.
Custom properties
Custom properties are used to save additional information about a procedure. This will not be further described in this user guide.
Handling errors
There are three settings on a procedure regarding error handling:
| Settings for error handling |
|---|
| Has Verdict | Decides whether the procedure has a verdict. |
| Skip rest on Step Fail | If this setting is turned on, a Fail identified during the execution of a procedure step will cause all subsequent steps to not run, but to be skipped. If one of the subsequent steps is a Cleanup-step, the execution will always continue after this step. |
| Goto Cleanup on Error | If this setting is turned on, an Error identified during the execution of a procedure step will cause the execution to jump to the inserted clean-up step. Normally, this setting is turned of which makes the execution of the procedure end immediately in case of an Error. |
Table with settings for error handling.
When a procedural step fails, the verdict for the procedure will be set to the same value. This means that if the error occurs during a sub procedure (a procedure called by another procedure), the verdict for the procedure step calling the procedure is set to the same value.
Use of Configuration Properties
The use of common constant values or Configuration Properties in a procedure can be administered under the tab Config Usage. Every value that you wish to use is inserted with Add Usage, which connects a selected Configuration Property with a chosen variable name, which it will be represented by.
Procedure models
A procedure model is an element, which is used to specify the common external properties of the procedures that use it. By linking a procedure model to a procedure, the procedure will automatically inherit the properties of the model.
A procedure model can also be linked to another procedure model. This is called inheriting from another model.
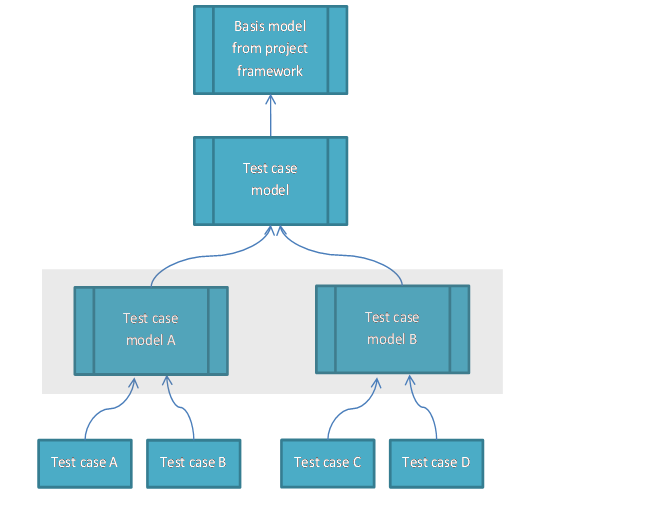
The most common used procedure model is the test case model found in the project definition. A test case is in fact a regular procedure that is connected to the test case model.
A derived procedure or procedure model automatically inherits both the properties and the values from the overall model, but it can also change both the value of the property (and thus override the inherited value) and add its own properties (which then again is inherited to the underlying objects).
Procedure models contain many of the same data as a procedure, but have no steps.
| Procedure model data |
|---|
| Name |
| Description |
| Model |
| Parameters |
| Partners |
| Custom Properties |
A procedure model can be considered as a definition the characteristics that a procedure should follow.
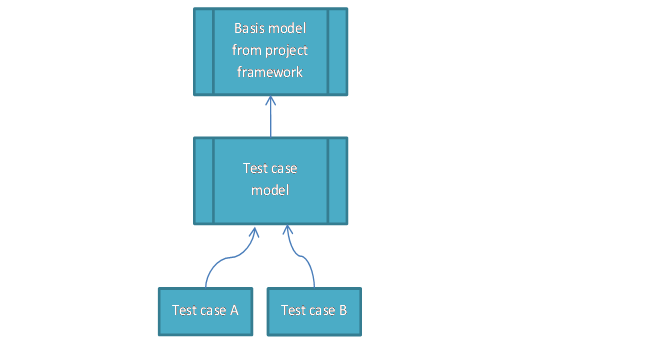
A typical project consists of a series of test cases that are built on the basis of the test case model (which is merely a procedure model for a test case), which in turn refers to a basis model from a project framework file.
If you have a large project you may need to define an additional administrative layer with several test case models to handle common characteristics of the underlying test cases.
Here a test case inherits the properties from the overall test case model, which in turn inherits properties from its overall framework file.
Here an extra layer with two test case models is created, each of which inherits the properties from the overall test case model, and where the derived test cases then inherit properties from their respective test case model.
Partners
In procedures and procedure models you can create what we call partners.
A partner in SeqZap is a type of helper procedure that you can reuse where you want it - for example to begin a specific procedure or to help with other things in a test suite.
Inherited partners are displayed with a grey partner icon, while overwritten and new partners are displayed with a purple partner icon.
Partners are divided into three different types, where you in the beginning probably mainly will use the first two:
Starter A starter is used to start a procedure or a test suite, and what is special about this type of partner is that you cannot use parameters in connection with the call – but on the other hand the starter is shown as a start button in the toolbar.
Helper A helper is used in the same way as a starter, but unlike a starter you can use parameters in your call with a helper - but a helper is not shown as a start button in the toolbar. A helper is primarily used in procedures, but can also be used for test suites.
Call-Proxy A call-proxy is used for calling a procedure (with or without parameters) via one of its partners (only counts for procedures), by which you can get the partner to either handle certain settings before the actual procedure call or even better to use another procedure model than the one that the procedure is inherited from.
If you create a procedure call in one of your procedures, you need to choose if the procedure should be called either directly (which it does by default), through a partner or by only calling the partner. If you decide that the call should take place through a partner, this would correspond to our proxy-partner.
Appendix
Data types
Boolean
Logical value, either true or false.
Converting data types (Casting)
Converting value from one data type to another is known as casting in SeqZap.
Some data types are directly convertible between one type and another, for instance, you can assign a decimal variable an integer value such as 42 without any problems. SeqZap allows you to do this conversion directly because no information is lost when concerting an integer to a decimal value.
Converting the other way, assigning an integer variable a value such as 3.14 is not allowed directly because SeqZap does not want you to accidentally lose any information. So to convert a decimal value to an integer you have to use a casting function.
Most casting function are called the same as the data type which you want to convert to, for instance, to convert a decimal value to an integer you would use the integer(decimal) function.
DataSource Reference
A reference to a data source.
Data Table Reference
A reference to a data table.
Data tables can also be addressed directly in expressions by name, so a data table reference variable is rarely used.
DateTime
A specific time on the timeline, for instance “the 4th of july, 2014.
A DateTime value also contains a kind of timezone data, it can be one of:
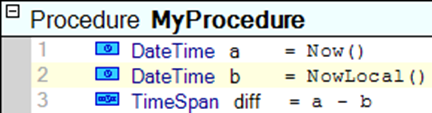
This is called the “kind” of the DateTime value can be determined by using the IsUTC, IsLocal and IsUnspecified expression functions.
SeqZap will report an error if two DateTime values with different “kind” are compared or combined, the following script, for instance, will report an error in step #3 because a UTC and a Local DateTime is subtracted from each other:
DateTime values can be converted from one “kind” to another by using the ToLocal and ToUTC expression functions, which will handle the conversion from one timezone to another correctly with regard to the local time of the computer running SeqZap. In other cases the expression functions ForceUTC and ForceLocal can be used to convert a DateTime to another kind without changing the DateTime value itself.
Decimal
Decimals in SeqZap are floating point values, technically they are represented as IEEE 754 double values (also known as double when developing Tools for SeqZap).
Enumeration
A named integer value, enumerations can both be defined directly in the script or in Tools.
GUID
A 16-byte (128-bit) unique identifier.
Integer
64-bit signed integer value (also known as long when developing Tools for SeqZap).
Loose Date
A loose date can represent non-existing dates, for instance the 45th of July, 1969.
Loose Time
A loose time can represent non-existing times, for instance 12:61:00.
Procedure Reference
A reference to a procedure, the reference can, for instance, be used in a procedure call step.
String
Textual data, represented as Unicode data.
Test Suite Reference
A reference to a test suite.
TimeSpan
A time interval, for instance “5 seconds”, TimeSpan is the result of subtracting two DateTime values from eachother.
Verdict
The result of a step, can take one of the following values:
- Unset
- Pass
- Fail
- Error
- Inconclusive
A reference to a tool instance, either returned by a tool method, or by creating a new tool instance using a Create Instance step.

 This applies for Windows 7 and 8, but you will find the equivalent commands in other versions of Windows.