
Concepts
Data types
Boolean
Logical value, either true or false.
Converting data types (Casting)
Converting value from one data type to another is known as casting in SeqZap.
Some data types are directly convertible between one type and another, for instance, you can assign a decimal variable an integer value such as 42 without any problems. SeqZap allows you to do this conversion directly because no information is lost when concerting an integer to a decimal value.
Converting the other way, assigning an integer variable a value such as 3.14 is not allowed directly because SeqZap does not want you to accidentally lose any information. So to convert a decimal value to an integer you have to use a casting function.
Most casting function are called the same as the data type which you want to convert to, for instance, to convert a decimal value to an integer you would use the integer(decimal) function.
DataSource Reference
A reference to a data source.
Data Table Reference
A reference to a data table.
Data tables can also be addressed directly in expressions by name, so a data table reference variable is rarely used.
DateTime
A specific time on the timeline, for instance “the 4th of july, 2014.
A DateTime value also contains a kind of timezone data, it can be one of:
- Unspecified
- Local
- UTC
This is called the “kind” of the DateTime value can be determined by using the IsUTC, IsLocal and IsUnspecified expression functions.
SeqZap will report an error if two DateTime values with different “kind” are compared or combined, the following script, for instance, will report an error in step #3 because a UTC and a Local DateTime is subtracted from each other:
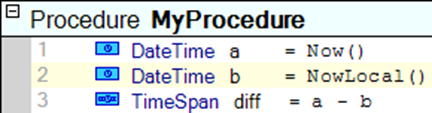
DateTime values can be converted from one “kind” to another by using the ToLocal and ToUTC expression functions, which will handle the conversion from one timezone to another correctly with regard to the local time of the computer running SeqZap. In other cases the expression functions ForceUTC and ForceLocal can be used to convert a DateTime to another kind without changing the DateTime value itself.
Decimal
Decimals in SeqZap are floating point values, technically they are represented as IEEE 754 double values (also known as double when developing Tools for SeqZap).
Enumeration
A named integer value, enumerations can both be defined directly in the script or in Tools.
GUID
A 16-byte (128-bit) unique identifier.
Integer
64-bit signed integer value (also known as long when developing Tools for SeqZap).
Loose Date
A loose date can represent non-existing dates, for instance the 45th of July, 1969.
Loose Time
A loose time can represent non-existing times, for instance 12:61:00.
Procedure Reference
A reference to a procedure, the reference can, for instance, be used in a procedure call step.
String
Textual data, represented as Unicode data.
Test Suite Reference
A reference to a test suite.
TimeSpan
A time interval, for instance “5 seconds”, TimeSpan is the result of subtracting two DateTime values from eachother.
Verdict
The result of a step, can take one of the following values:
- Unset
- Pass
- Fail
- Error
- Inconclusive
ZapTool Reference
A reference to a tool instance, either returned by a tool method, or by creating a new tool instance using a Create Instance step.
Devices
In SeqZap the concept of devices is used much like it is in Windows. A device in SeqZap is a software object typically connected to a physical device connected to the PC.
Different device types are supported by SeqZap and any other types can be added by developing or installing plug-ins.
Device Entities
Many physical devices have more than one separate entity of functionality.
E.g. most data acquisition devices have several individual inputs and/or outputs. In SeqZap they are all handled as individual Device Entities.
Likewise, the device access in scripts is for most devices done with tool methods addressing a single device entity of a specific type.
Device Browser
The Device Browser is a view/panel in SeqZap Studio for browsing the detected, connected and created devices in SeqZap.
The Device Browser is opened via the “View Device Browser” in the “Devices” menu of SeqZap Studio.
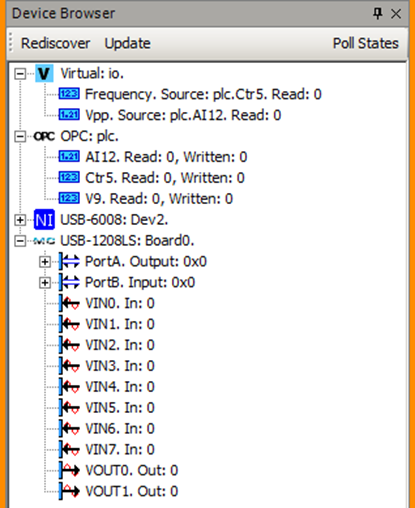
The Device Browser shows all known devices and their device entities.
The “Rediscover” button tries to discover newly connected detectable devices.
The “Update” button checks all known devices for changes in state and changes in the list of device entities.
The “Poll States” button will start polling all devices and device entities for changes in their state, to keep the device browser view updated. The polling will continue at a regular interval (a few times per second) until the button is pressed again to turn off the state polling.
Selecting a device or a device entity in the view will show its setup and interactive user interface in the Properties view.
Right-clicking a device or a device entity will show the context menu for the selected.
Virtual Devices
A Virtual Device in SeqZap is a device created by a tool or by a script (workbench tool). A Virtual Device is a type less device with any number of virtual device entities of any type.
A virtual device is used as an abstraction between the connected physical devices and the test script.
This is also called a testbed.
Each device entity is linked to another compatible source device entity.
By using a virtual device, existing scripts can remain unchanged if a physical device is replaced by another model or a completely different device type.
The test scripts can also be made more readable by assigning the virtual device entities meaningful names.
For more information on creating a virtual device in a test script please refer to the Devices section of the tools manual.
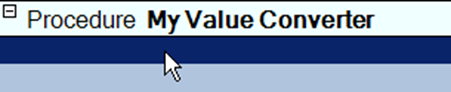
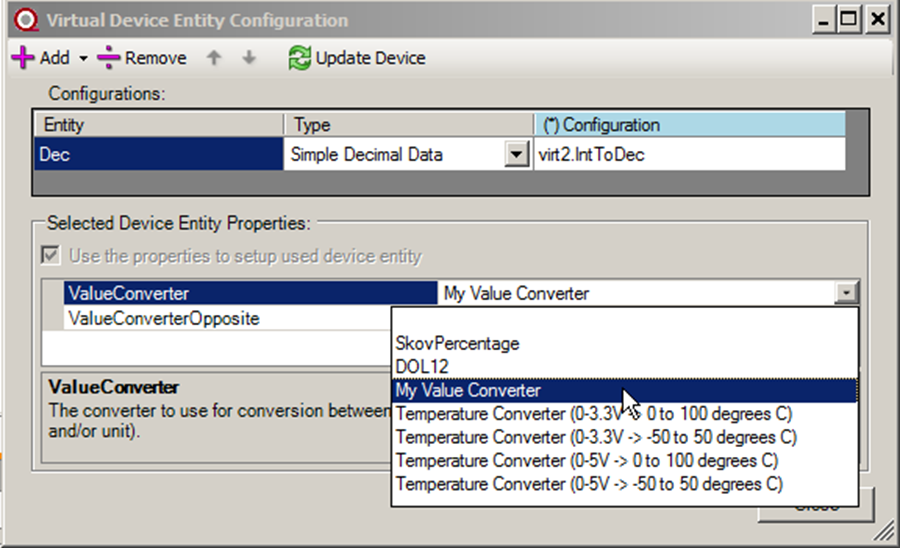
Value Converters
Decimal device entities can have value converters attached, for example to convert a read analog voltage sensor value to the equivalent temperature.
A value converter is simply a procedure defined in a normal SeqZap scripts, but which is linked to the value converter model.
The value converter model is defined in the [SeqZap]\Framework\ValueConverterFramework.szs file which is shipped with SeqZap, the file is automatically referenced when a new project is created, but SeqZap will also suggest adding it when a Virtual Tool is added to a script file.
Value converters are identified by a name, but also contain a description and the units it converts from and to.
Value converts can convert both “from” and “to” a value, for instance both “from” a voltage sensor “to” a temperature and “from” a temperature “to” a voltage sensor – this is referred to a converting “in the opposite direction”.
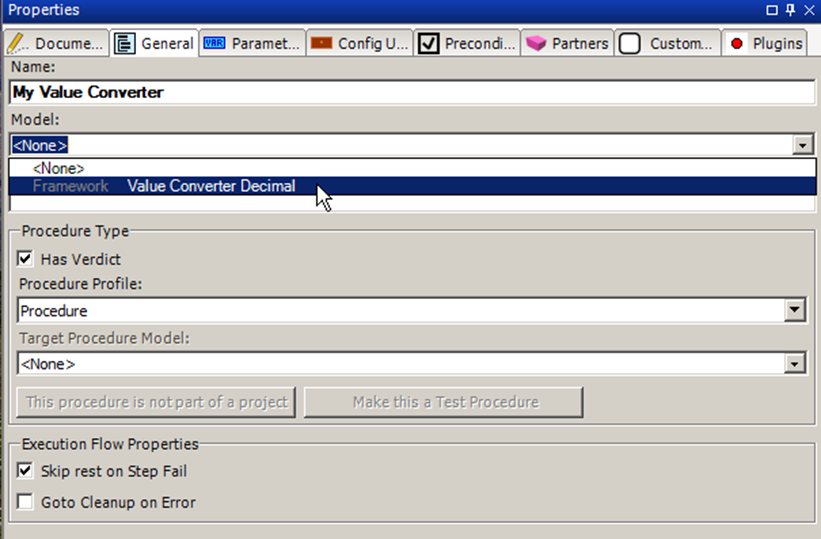
Writing a value converter
- Create a procedure and give it an appropriate name and description.
- Link the procedure to the value converter model.
- The procedure will now have a series of parameters and custom properties defined.
- The FromUnit and ToUnit custom properties can be overridden and assigned to something useful, for instance for a value converter from voltage to celcius.
- The value converter can now be used, for example, on a Simple Decimal Data input entity.


The ValueConverterFramework.szs file contains a number of value converter procedures which can be used for inspiration.
Reports
FACTS
The FACTS report will generate XML files which can be imported in CIM FACTS
- A tool for Statistical Process Control (SPC) - to get historical statistics on test results.
Adding FACTS DUT data to the report
The FACTS report will use specially named DUT data to write the FACTS report.
The supported FACTS DUT Data value names are:
- TestName
- TestStation
- TestVersion
- TestSocket
- TestOperatorType
- TestOperatorUser
- TestFixture
- TestCategory
- BatchSerialNo
- OrderNumber
- OrderQuantiy
- SerialNo
- ItemNumber
- Revision
All these DUT Data values can be prefixed with FACTS_ to make sure that they do not clash with other DUT data, for instance, TestName can be assigned as FACTS_TestName as well.
To make it even easier to add FACTS DUT Data the ProjectFramework.szs file include procedures for adding the DUT Data in a standard way.
It also includes a procedure called “Add Standard FACTS Report DUT Data” which will add the FACTS DUT Data which are required for the report to be successfully imported in FACTS.
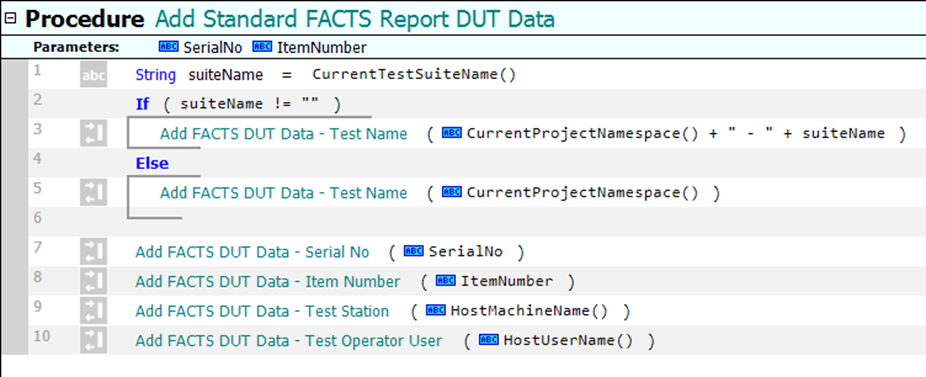
This procedure can be called from anywhere in a test, but it is recommended to call it in the Setup partner procedure of test cases.
Importing using FACTS
The generated reports are imported in FACTS by using the CPT Test Station Client.
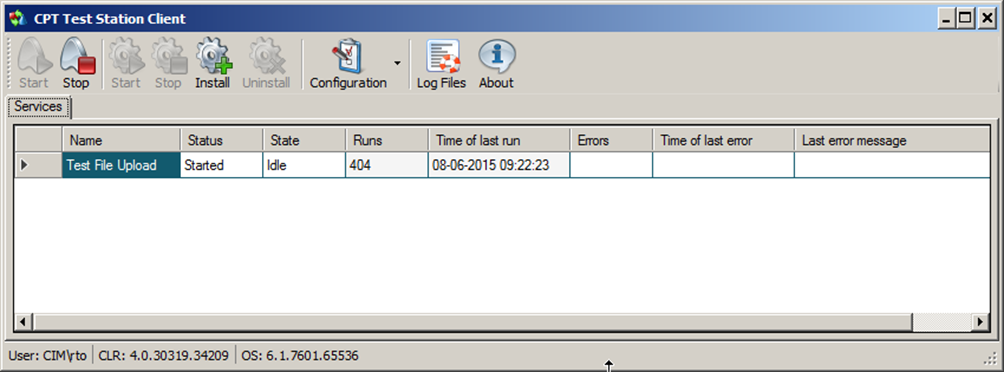
The client monitors the directory C:\Users\Public\Documents\CPT\CPT_XML\Pickup\ for new reports and will send and eventually delete the CPT report files written to that directory.
This means that to automatically import the generated CPT report must be written in the pickup directory, for example on the SeqZap command line:
--reportfile “CPT= C:\Users\Public\Documents\CPT\CPT_XML\Pickup\”
New Report
The new report is SeqZap default HTML report, it provides the entire execution log of each test case.
The report can optionally contain external data which is saved in a directory next to the generated .html report file named <filename>_data.
Please note that the name of the report contains a space, so when specifying it on the command-line it is necessary to enclose the name in “quotes”.
JUnit
The JUnit report makes it easy to integrate SeqZap with other tools which understand and read the JUnit format, for example, the Jenkins Continous Integration server.
Printing
Script files in SeqZap can be printed, either to a file or as physical paper on a printer.
Printing SeqZap script files can be used to make it possible for non SeqZap users to read SeqZap scripts, for example when reviewing scripts.
But additionally, printing scripts files can be used as documentation of the tests written. This makes it possible to write the test specification directly in SeqZap instead of first writing the test specification as a Word document and then translating it to a SeqZap script.
SeqZap scripts can be printed both from the SeqZap Studio application and from the command line SeqZap using special command line flags.
Printing from SeqZap Studio
Printing from SeqZap Studio is done by selecting Print from the File menu at the top of the SeqZap Studio window.
This will open the Print dialog.
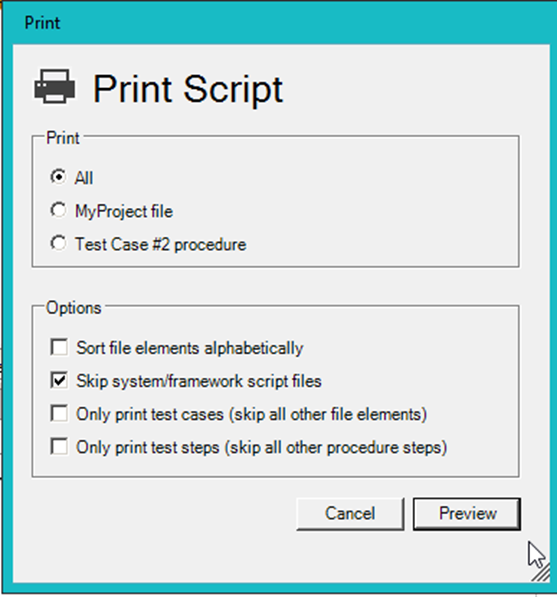
This dialog allows selecting what to Print:
- The entire project
- The script file which is currently shown
- The procedure which is currently selected
Several options can also be toggled:
- Sort file elements alphabetically
Will sort the printed file elements (procedures, test suites, etc.) alphabetically
- Skip system/framework script files
If checked, the framework files shipped with SeqZap (such as the ProjectFramework.szs file) will not be printed.
- Only print test cases
If checked, only the test cases will be printed, this is useful when wanting to print a test specification documenting the written tests.
- Only print test steps
If checked, only the Test Steps of procedures/test-cases will be printed. This is often used in combination with the “Only print tests cases” option to create a light executive overview style test specification.
After selecting what to print and the options to use, the Preview button should be clicked which opens a preview tab of the printed document.
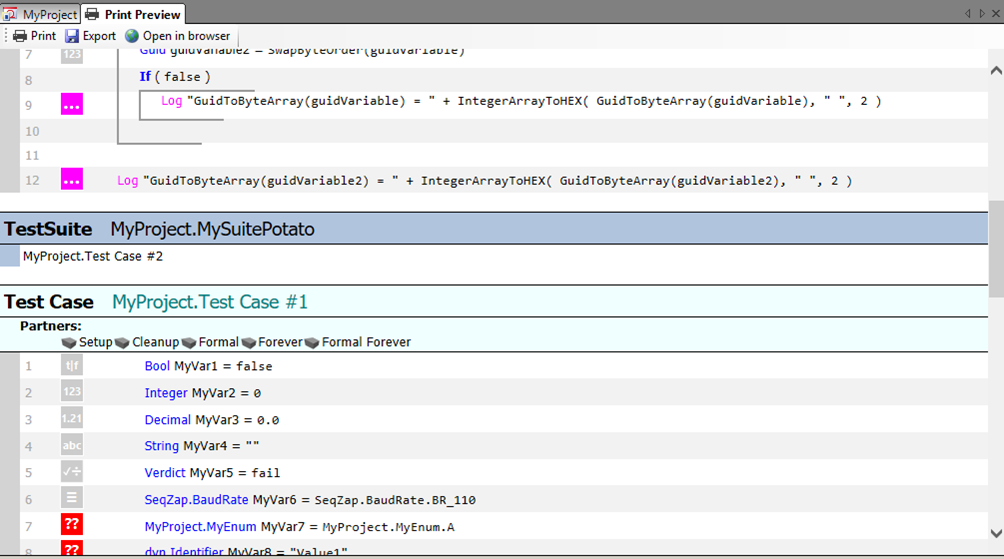
Using the toolbar buttons at the top of the tab, it is possible to print the document on a printer, export the printed document as an HTML file or open the printed document in the system’s standard browser (Internet Explorer, Firefox, Chrome, etc.).
The print preview can be closed by clicking the “X” button at the top-right corner of the tab.
Printing on the command line
Printing on the command line is actually writing the printed document as an HTML file and saving it as a file.
The HTML file to write to is specified by using the --print argument to %SEQZAP_EXE%.
A number of options to change the printed document can also be specified. The options are documented in detail in previous section.
--print <filename>
Specify the HTML file to write, the target directory must exist.
--print-sort-alphabetically
Sort file elements alphabetically.
--print-system-files
Print system/framework script files.
--print-only-test-cases
Print only test cases.
--print-only-test-steps
Print only test steps.
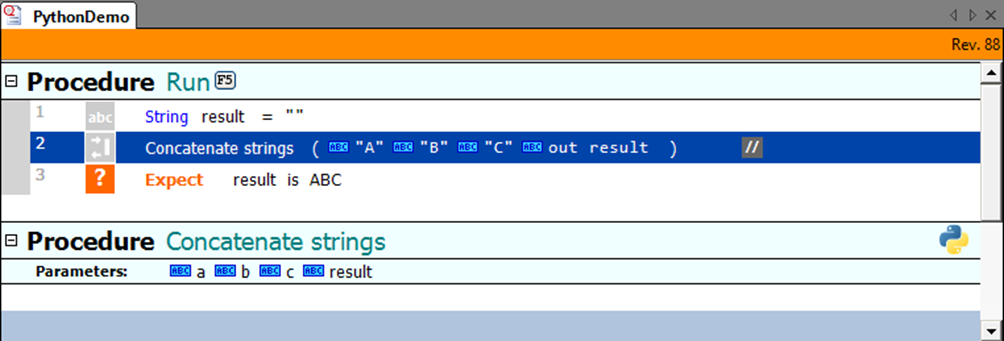
Python Procedure
In SeqZap it is also possible to call Python code in addition to SeqZap scripts.
Python code might be more familiar to developers, but they also make it hard for non-developers to read and understand tests.
We recommend using Python as a utility language for doing things which a normal programming language is better for, for example, string manipulation, while keeping the actual test cases in SeqZap scripts.
Python procedures are used just as normal procedures - they can be used as test cases or called using the Procedure Call step.
The setup pages of Python procedures look and work just like the setup pages of normal procedures, there is just one additional setup page where the Python procedure to call can be defined.
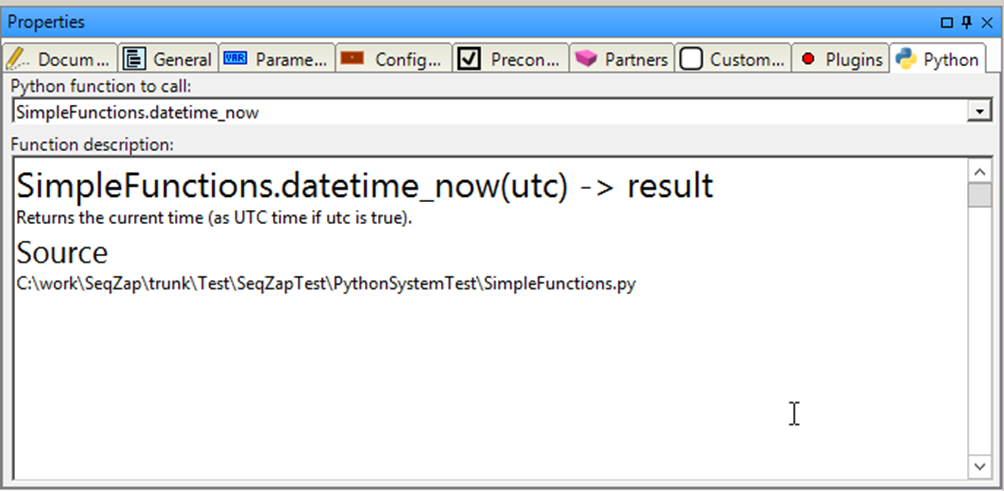
Selecting procedure
After a Python script file reference is added, it is searched for functions every time the SeqZap parser runs.
This makes it possible to select the functions in the file on the setup page of the Python procedure.
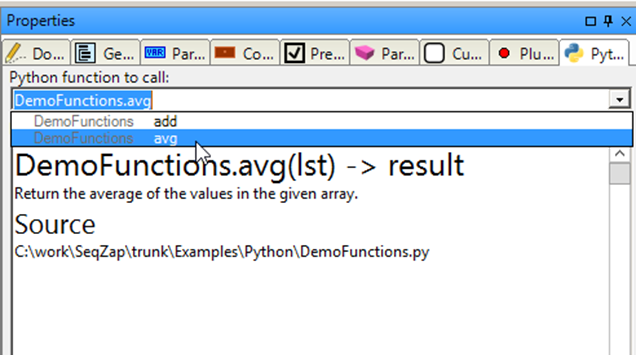
Both the parameters and optional Python “docstring” documentation of the Python function is shown for the selected function.
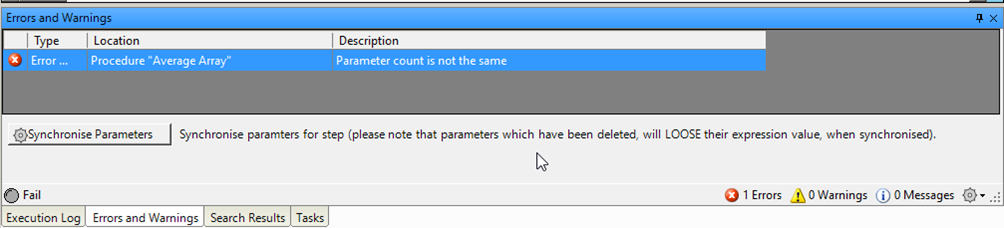
If the parameters defined by the Python function does not match the parameters defined by the Python procedure in SeqZap, a parser error will be reported:
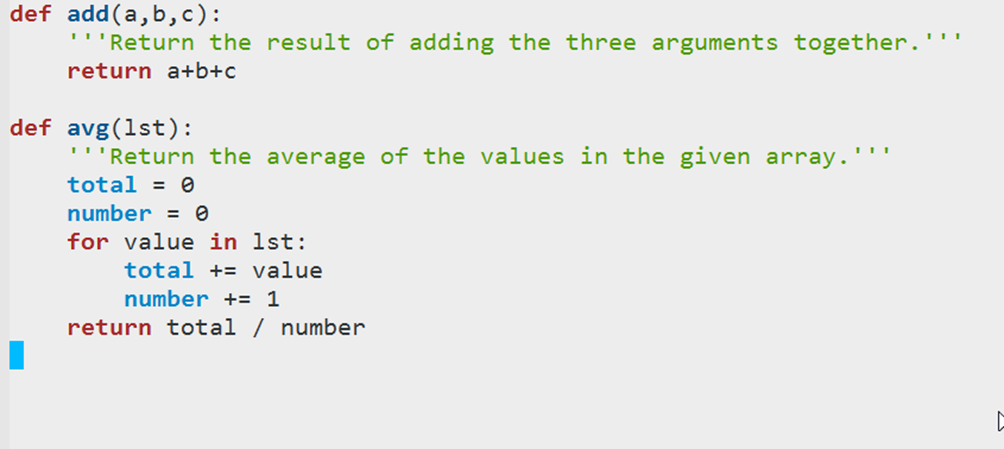
The parser only considers the name of the parameters, but not the types since Python does not use static typing. The Python procedure in SeqZap will define the types expected and returned by the function.
This also makes it possible to use the same Python function for multiple SeqZap types, for instance, the “avg” Python function above would work equally well for both Integer and Decimal arrays.
An example of this is shown in the File -> Examples -> Python -> PythonDemo.szs example file.
Script File References
The first thing to do to call a Python function from SeqZap is to add the Python script file as a reference to a SeqZap script file.
This is done by selecting the file in the File Explorer, and using the properties view to add a reference.
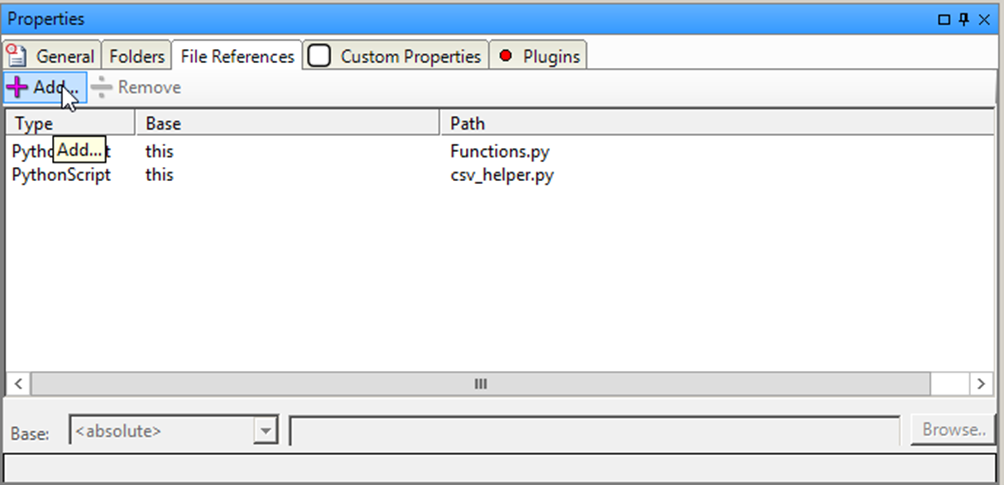
By default, SeqZap asks for the SeqZap script file to reference, but by changing the file type to “Python Script Files” it is possible to select python files.
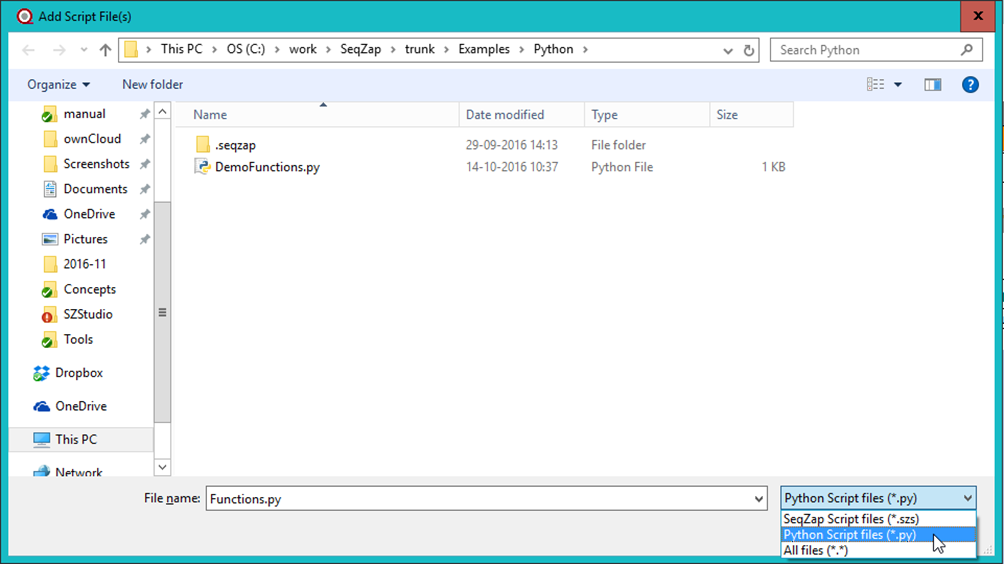
Here, a reference to the DemoFunctions.py Python script file is added.
Steps
Procedures/test-cases in SeqZap are implemented using procedure steps, normally just referred to as steps.
Procedure Call
This is a Procedure Call step, which is used to call/execute another procedure.
If the procedure to be called has parameters, the values to pass are also setup in this step.
The procedure call step also has some options for calling the target procedure in other ways, different from the normal way.
For instance, logging in the called procedure can be disabled.
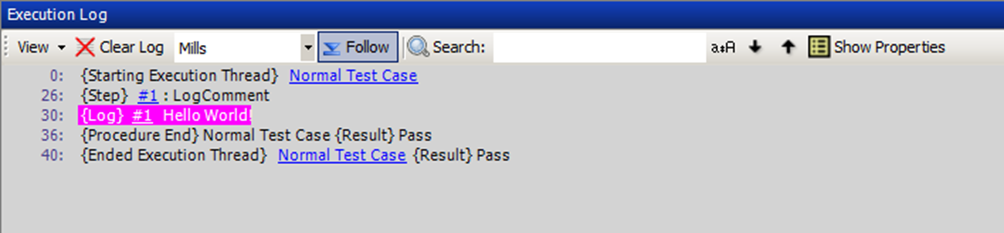
Log
Add a line in the execution log with the resulting text of the specified expression evaluation.
This is a Log step, which is used to "e;manually"e; add an entry in the execution log.

All the details about the execution flow are automatically logged, so this step is only used to log some additional information.
The log line is purple/magenta in color by default when seen in the execution log in the procedure:
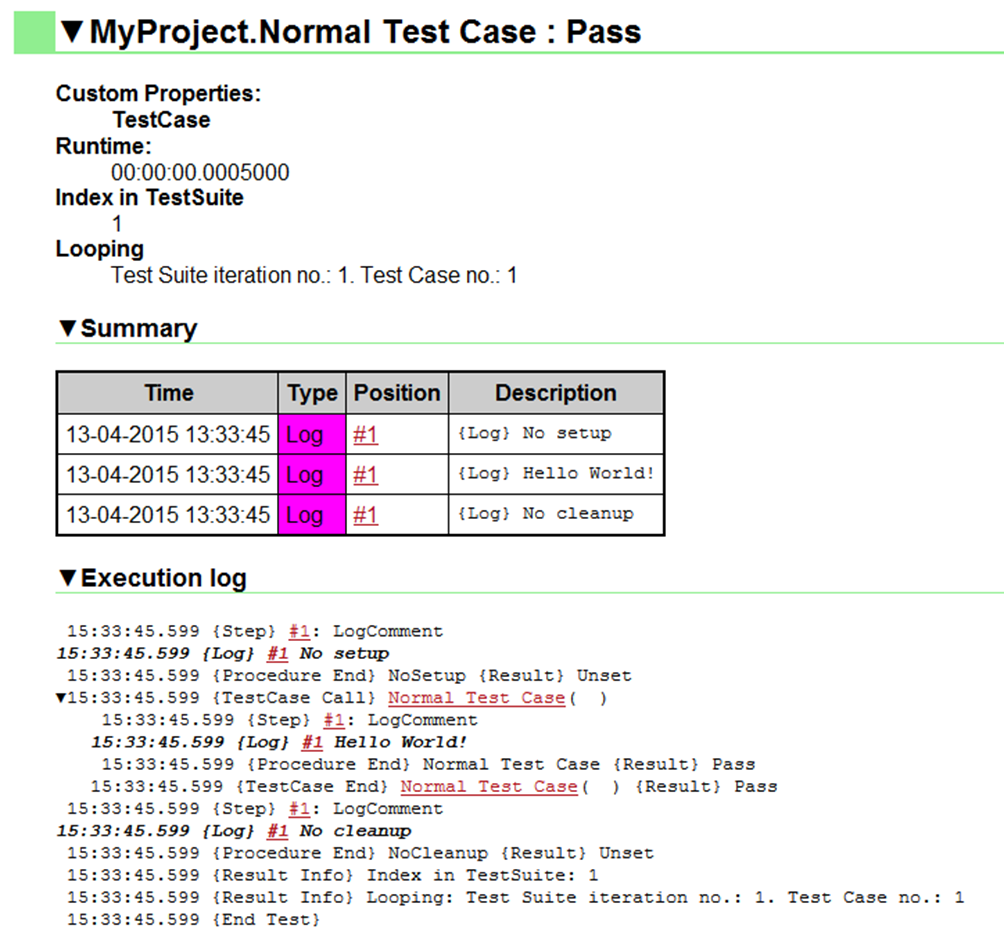
The log step is also added to the summary of the test case when shown in the HTML report, here it is also purple/magenta, but in the execution log in the HTML report the step is simply shown in bold:
Whether or not a log comment is added to the log is determined by the “Condition” settings.
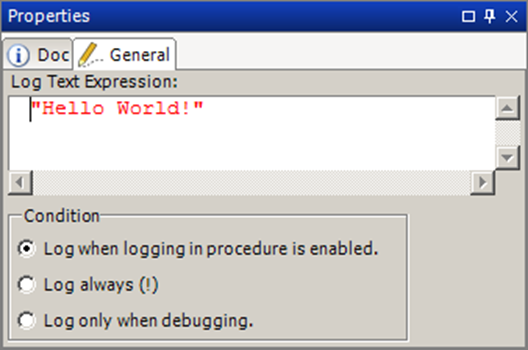
Log when logging in procedure is enabled is the default where logging is printed, unless the procedure containing the log comment is called by a Procedure Call step where the “No logging inside called procedure” option is enabled/checked.
To override the “No logging inside called procedure” option, the log step can use the “Log always” condition, this means that the text will always be written to the execution log.
Finally, the “Log only when debugging” option means that the text will only be written when SeqZap is in debugging mode.
Activation Server
The SeqZap Activation Server manages SeqZap licenses and also provides other services such as new versions of SeqZap and failure reporting.
Logging in
The Activation Server can be accessed at:
https://activation.seqzap.com/
The username to use is either the name of the company where you are employed, or the email address of the SeqZap license administrator for your employer.
If the password has been forgotten a password reset can be requested using the SeqZap license administrator’s email address.
Licenses and Machines
The frontpage of the SeqZap Activation Server show the list of machines which are registered, the page also shows the serial number of the company which is logged in, this is the serial number to use when starting SeqZap for the first time on a new machine.
If a machine is selected, details are shown about the selected machine:
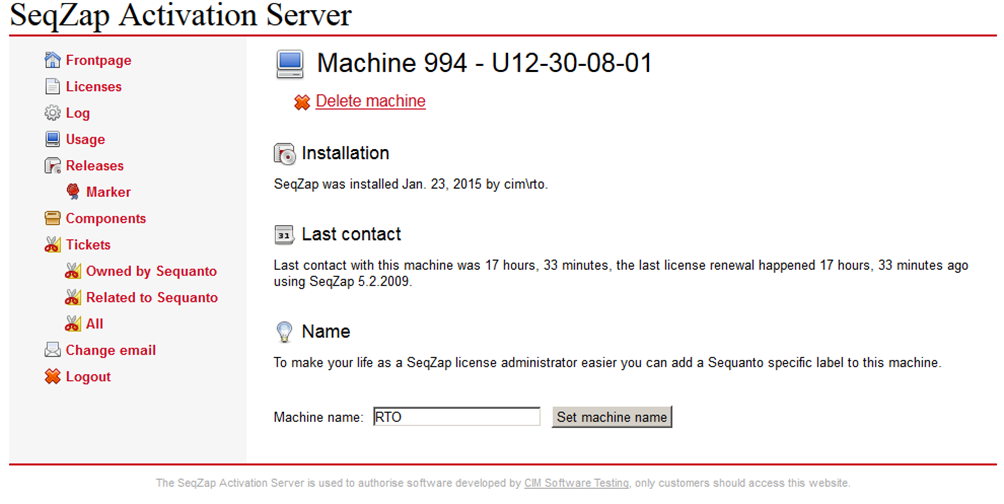
The SeqZap license administrator can set a more recognizable name for the machine to make it easier to find the machine in, for example, the usage listing which is available by clicking the “Usage” link:

Releases
SeqZap is developed in an agile manner which means that new versions are often released.
When CIM Software Testing A/S finds that a particular versions of SeqZap is deemed stable it will be marked as such when CIM Software Testing A/S moves the “Stable” marker to the that particular version.
CIM Software Testing A/S controls the “Stable” marker and customers of SeqZap will normally follow this marker.
Following a marker simply means that SeqZap running on the users’ machine will show an Upgrade/Downgrade button on the Maintenance toolbar in SeqZap when the running version is different from the marker’s version.
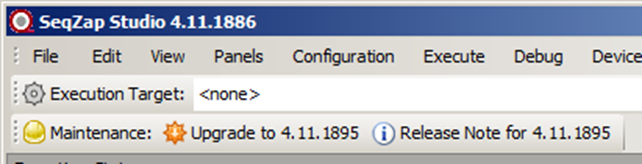
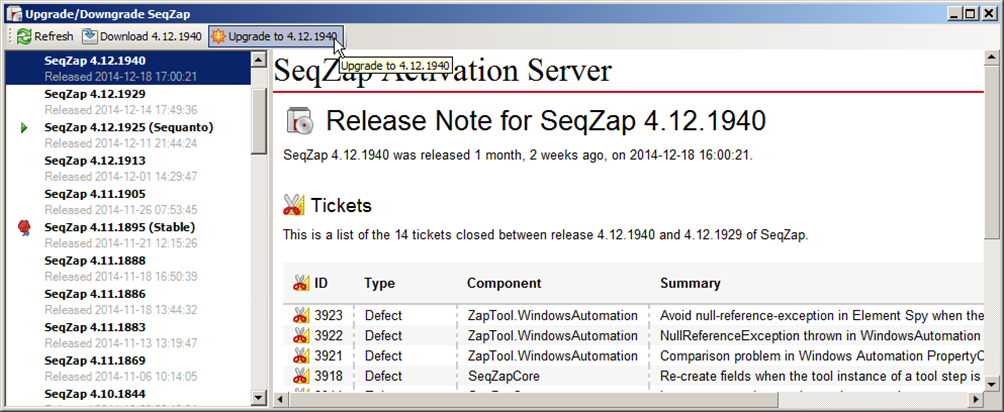
In the screenshot below, SeqZap 4.9.1886 is running, but the version marked as “Stable” is version 4.11.1895 so the “Upgrade” button is shown.
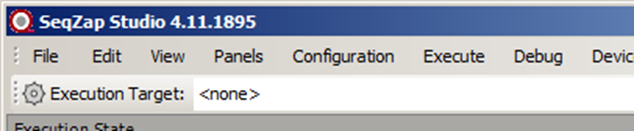
When SeqZap is running the “Stable” version, the “Upgrade” button is not shown:
Customer controlled marker
It is also possible for the SeqZap license administrator to decide that her/his company will decide which version is the preferred version of SeqZap.
This is done on the Releases -> Marker page:
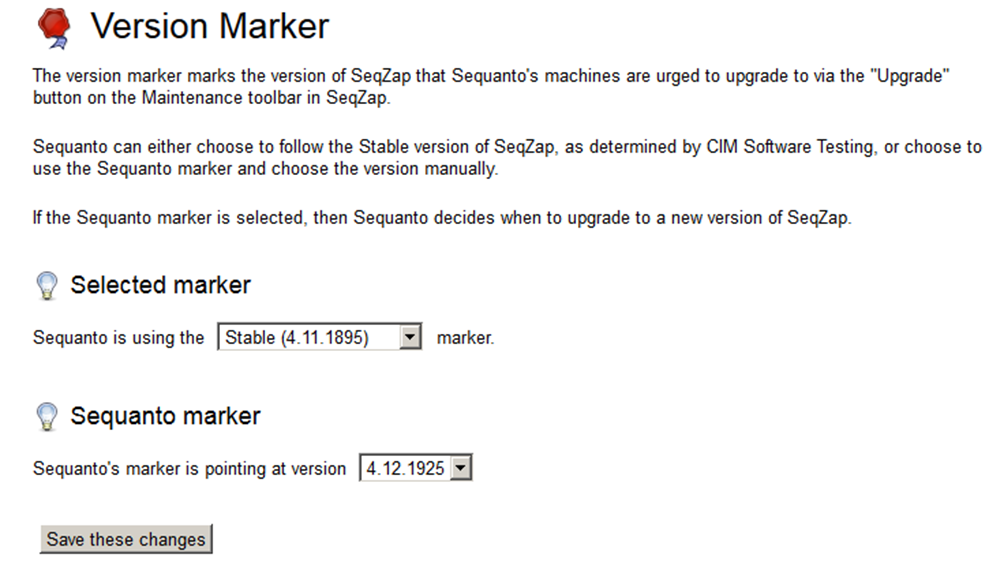
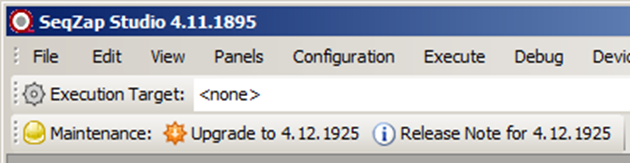
If the SeqZap license administrator selects the “Sequanto” (company) marker instead of the “Stable” marker, then the users will be presented with the following “Upgrade” button:
Please note that the SeqZap license administrator, or anyone else, can use the Help->Upgrade/Downgrade dialog to test new versions before deciding to move the marker.
Debugging Mode
SeqZap can be put in debugging mode in SeqZap Studio by using the Debug->Debug mode menu item or on the command line by using the --debug argument.
The Procedure Call and Log steps react to whether or not SeqZap is in debugging mode.
Tools can also react to whether or not SeqZap is in debugging mode, for example by providing more logging when SeqZap is in debugging mode.
User Interface
This chapter covers user interface elements in SeqZap.
Help
SeqZap comes with a built-in context sensitive help system which can always be accessed by pressing the F1 key.
If you press F1 SeqZap will open the Context Help view, if it is not opened already, and navigate to the element which currently has keyboard focus.
As an example this is the help shown when a local variable step is selected in the file editor and the F1 key is pressed:
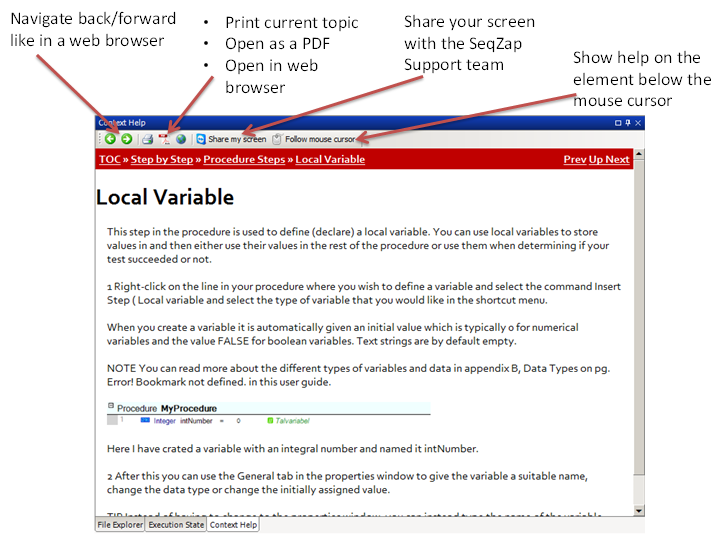
The “Follow mouse cursor” button is a useful way to explore the user interface of SeqZap, toggling it on and moving the cursor over SeqZap Studio can be very instructional.
The context help system covers all of SeqZap, and can be used to get information about things such as:
- Steps in scripts
- Both built-in steps and tool steps
- Even custom tool steps can provide context help.
- File elements in scripts such as
- Procedures
- Workbenches
- Test Suites
- Setup Pages and other property pages
- Inidividual controls can provide context help to explain precisely what a particular control is for.
- Views
- The individual controls on the view can also provide context help so you never have to wonder what a particular button does.
- Tool Panels can also provide context help
Getting Support
CIM Software Testing responds to problems and questions regarding general use of SeqZap.
The SeqZap Support team can be reached by e-mailing support@seqzap.com or by calling +45 96 84 05 00.
Sharing your screen
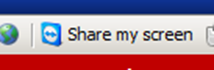
During support the SeqZap Support team might ask to share your screen, this is done by clicking the “Share my screen” button in the Help viewer which is opened by pressing F1.
If TeamViewer is already running, the following dialog box will appear:
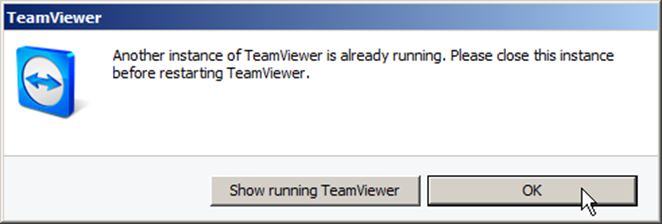
The already running TeamViewer instance can be closed by right-clicking the TeamViewer icon in the tray area and selecting Exit TeamViewer.
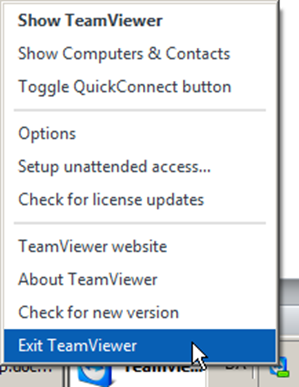
After TeamViewer is stopped, the “Share my screen” button can be pressed again.
Extended support
CIM A/S is also available as consultants for things beyond the scope of normal support obligations, for example:
- Helping with getting started with testing
- Helping with test specification
- Implementing the test
- Implementing customer tools
Please contact CIM A/S for more information.
Script Editing
A big part of using SeqZap is writing scripts, so we have put a lot of effort into making script editing as easy as possible.
Inserting steps using the mouse
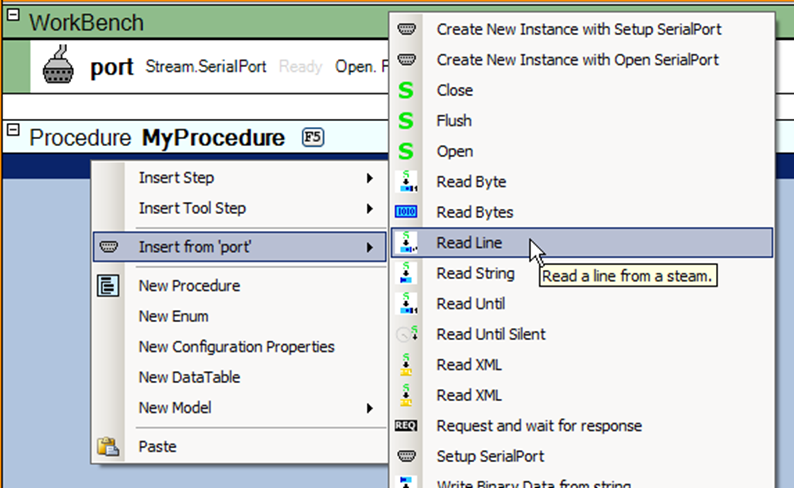
Steps can be inserted by right-clicking inside a procedure, including the “empty” space after a procedure.
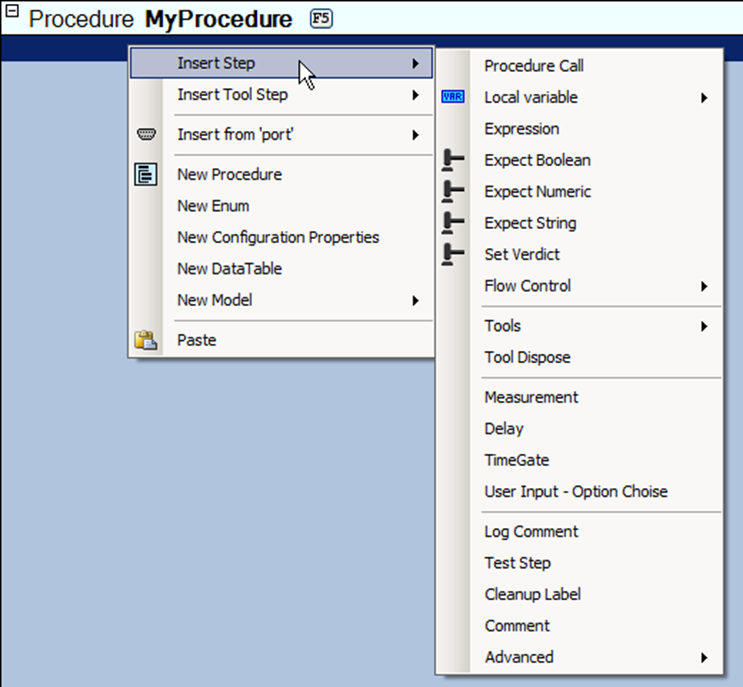
If the current script-file or current project contains workbenches, the workbench tools will also be added to the right-click menu to make it easier to insert steps using that tool.
Inserting steps using the keyboard
Steps can also be inserted using the keyboard using a SeqZap feature called Smart Insert.
Smart Insert is activated by pressing enter inside a procedure.
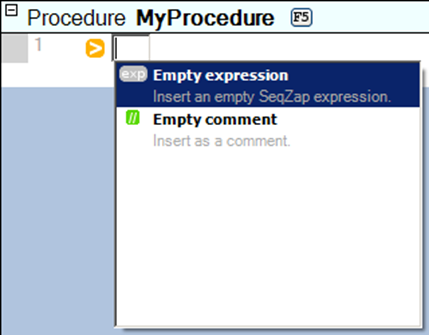
This opens a Smart Insert prompt, identified by the orange insert icon.
Smart Insert suggests inserting an empty expression or an empty comment when the prompt is first shown because that is the most inserted steps.
When text is written in the smart insert field, SeqZap will suggest steps which can be inserted.
For instance, this is the suggestions for the word “if”:
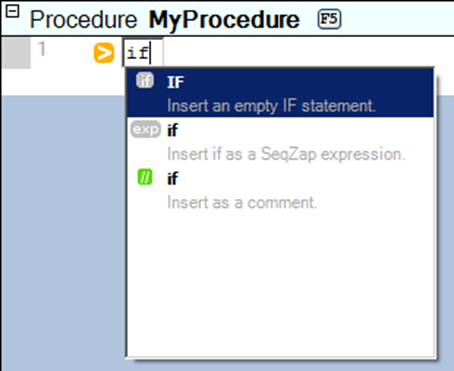
The first suggestion is to insert an IF statement, the last two suggestions are always to insert the written text as an expression step or a comment step.
Many Smart Insert suggestions will also consider the rest of the prompt when suggesting step, for instance, these are the suggestions for “if a == b”:
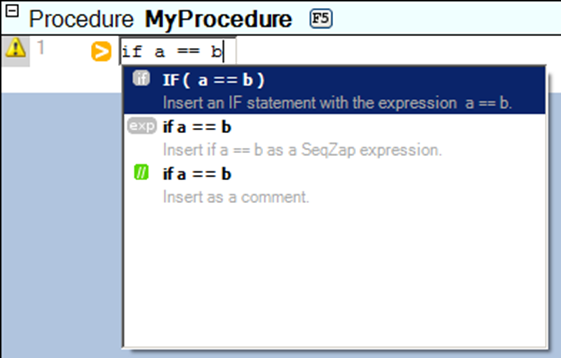
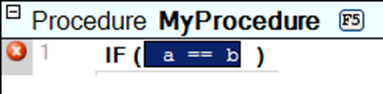
The suggested IF step now considers the rest of the prompt as the condition for the IF step.
A suggestion is activated by pressing the ENTER key.
Smart Insert will also suggest tool methods and properties.
If the current script-file or project contains workbenches, Smart Insert will start by suggesting tool methods and properties for the tools in the workbenches. For instance, Smart Inserting “read” when a serial port named “port” exists in a workbench looks will suggest the following:
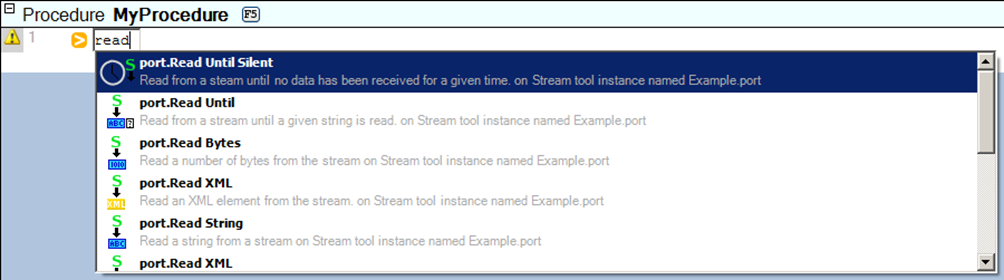
Notice how the description (the gray text) of each suggestion says that the inserted step will sue the “Example.port” workbench tool.
Re-arranging/moving steps/procedures/etc.
Re-arranging steps in SeqZap is done by selecting the steps to move, either by holding down Shift and using the arrow keys, or by using the mouse and the Ctrl and Shift keys.
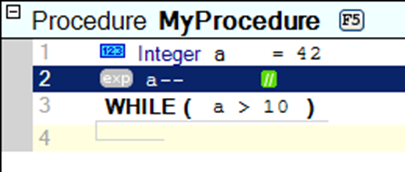
Next, hold down the Alt key while using the Up and Down arrow keys to move the selected step(s):

File elements like procedures and data-tables can also be moved by using the same keyboard shortcuts.
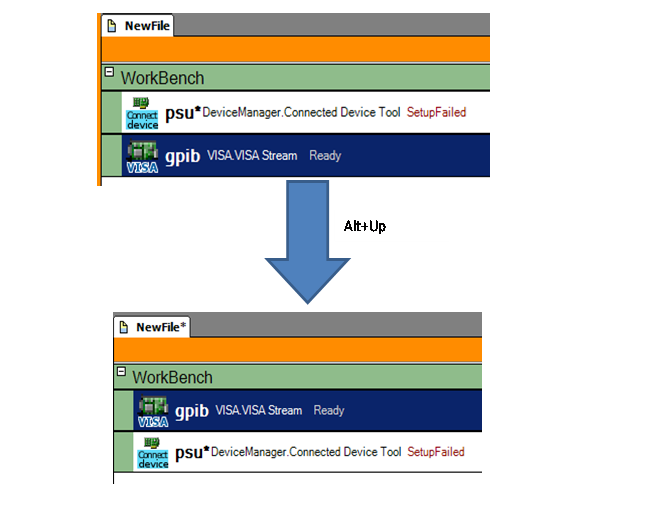
Re-arranging/moving workbench tools
Workbench tools can be selected and re-arranged by using the same keys as for steps:
Script Debugging
This section of the manual lists the various means of finding and fixing errors, also known as bugs, in test scripts by using SeqZap Studio.
Single Stepping
When single stepping SeqZap will only execute one step at a time, this can be a very good way of verifying a script one step at a time to make sure that it does what is expected.
Single stepping can be initiated in one of three ways:
- The Single Step button is pressed in the Execution State view which will start execution and pause it immediately before the first step is executed.
- The Pause button is pressed in the Execution State view which means that execution will pause after the current step has finished executing.
- Just before a step with a breakpoint is executed.
When
Execution State View
The execution state view is the best way of finding out what the current execution is doing it. SeqZap shows a lot of information about the current execution in the Execution State view, for instance when a delay is executed the passing of time is shown in the Execution State view.
When single stepping, the Execution State view is used to control and inspect the current exectution.
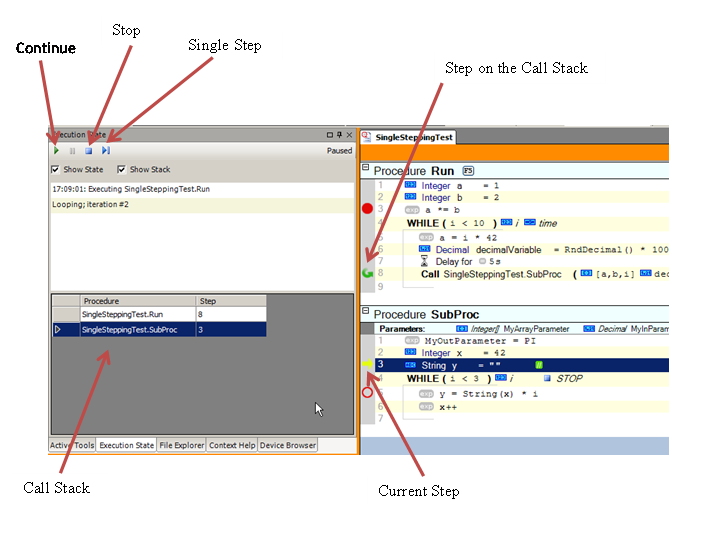
- The Continue button makes SeqZap resume normal execution of the script.
- The Stop button makes SeqZap stop the execution of the script.
- The Single Step button executes the current step, and pauses execution after it is done.
- If the “Show Stack” checkbox is toggle, the called procedures are shown in the call stack at the bottom of the Execution State view.
- Steps on the call stack are marked with a green “recycle” arrow in the margin of the step.
- The current step at the top of the call stack is marked with a yellow arrow in the margin of the step.
Variable Inspection
When execution is paused inside SeqZap Studio the values of the variables in the current procedure can be inspected using the Variable Inspection view, available from the View menu or using the keyboard shortcut Alt+V, V.
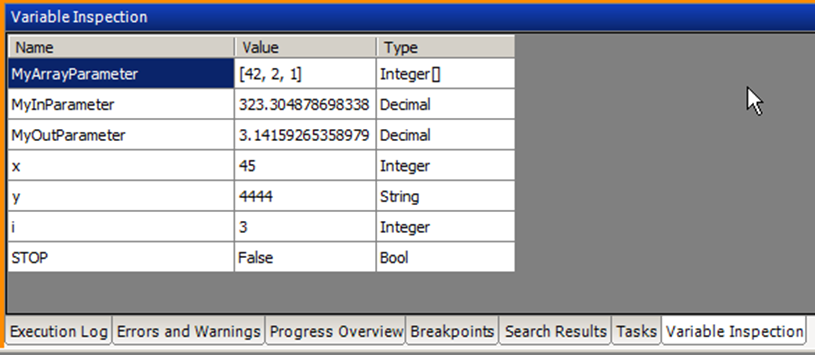
It is also possible to see the variables of other items in the current call stack by double-clicking the call stack in the Execution State view.
Many tools also allow inspection of the state of the tool, or the target/instrument which the tool is connected to, by opening tool panels on the tool.
Breakpoints
Steps can contain a breakpoint, a breakpoint is simply an instruction to SeqZap to pause the execution just before a step is executed.
Breakpoints for steps are inserted/removed either by right-clicking the step or by pressing F9.
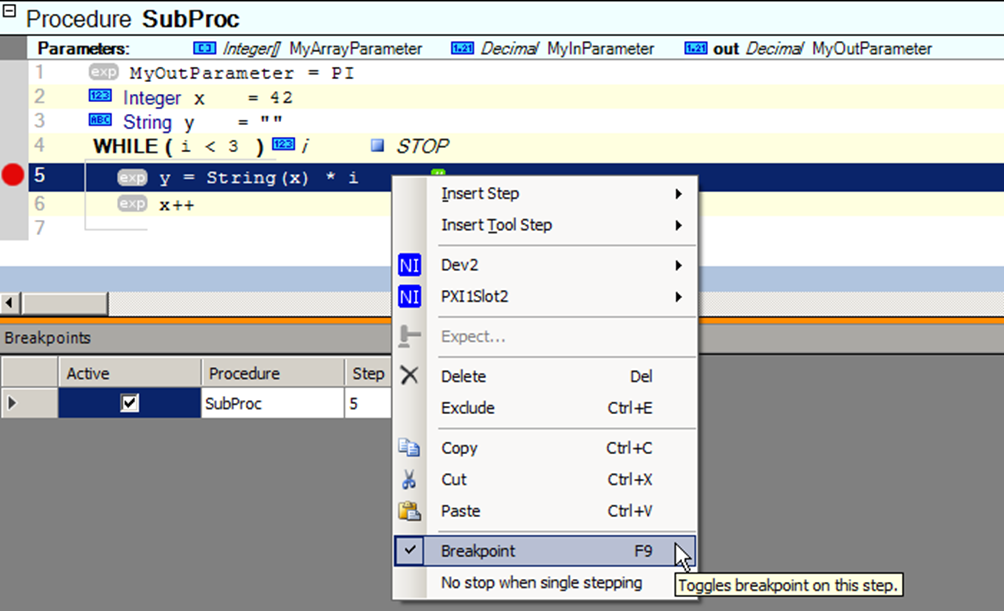
When a step has a breakpoint, a red circle will be shown in the margin for that step.
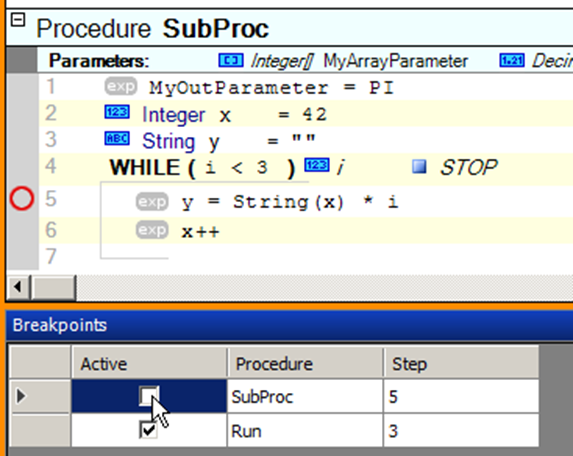
Breakpoints View
The breakpoints view lists all the currently inserted breakpoints.

It can be accessed using the View menu in SeqZap Studio, or by using the keyboard-shortcut Alt+V, B.
Breakpoints can also be in-active, which means that they are inserted but SeqZap will not react to them.
When a breakpoint is inactive it will be shown with the outline of a red circle in the margin of the step.
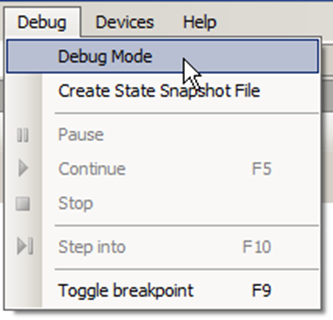
Debug Mode
Using the Debug -> Debug Mode menu item inside SeqZap Studio or using the --debug command line argument, SeqZap’s Debug Mode can be toggled.
Many tools log additional data to the execution log when SeqZap is in debug mode.
Keyboard shortcuts
The following table show common keyboard shortcuts in SeqZap.
| Shortcut | Description |
|---|---|
| Arrow keys | Move the cursor |
| Alt+Up/Alt+Down | Re-arrange steps or test cases in test suites |
| Ctrl+Up/Ctrl+Down | Select the previous/next file element in the current script file |
| Ctrl+C | Copy to clipbaord |
| Ctrl+D | Focus the script editor |
| Ctrl+E | Exclude/Include the currently selected step/file-element |
| Alt+E | Toggle expand/collapse of the selected element (e.g. procedure) |
| Ctrl+F | Search in the open files, the result is shown in the ”Search Results” view. |
| Ctrl+G | Jump to file element by name |
| Ctrl+K | Delete the current line in the script editor |
| Ctrl+N | Create a new script |
| Alt+N | Select the next error in the Errors & Warnings view |
| Alt+P | Select the previous error in the Errors & Warnings view |
| Ctrl+S | Save the current script |
| Ctrl+V | Paste from clipboard |
| Ctrl+X | Cut to clipbaord |
| Ctrl+Z | Undo |
| Ctrl+Y | Redo |
| F2 | Edit the selected field in the script editor |
| Ctrl+F4 | Close the current script |
| F5 | Execute the default procedure/testcase/testsuite |
| Ctrl+F5 | Execute the current procedure |
| F9 | Insert a breakpoint for the current step |
| Shift+F10 | Open the context menu (right-click menu) for the selected element |
| Ctrl+Plus (+) | Expand all elements |
| Ctrl+Minus (-) | Collapse all elements |
| Ctrl+Multiply (*) | Collapse all elements, except test steps |
| Ctrl+Enter | Insert a new step |
The following keyboard shortcuts can be used to switch between the views of SeqZap.
| Shortcut | Description |
|---|---|
| Ctrl+D | Show and focus the current script |
| Alt+V, P | Show and focus the Properties view |
| Alt+V, F | Show and focus the File Explorer view |
| Alt+V, E | Show and focus the Errors & Warnings view |
| Alt+V, L | Show and focus the Execution Log view |
| Alt+V, X | Show and focus the Execution State view |
| Alt+V, O | Show and focus the Progress Overview view |
| Alt+V, R | Show and focus the References view |
| Alt+V, B | Show and focus the Breakpoints view |
| Alt+V, C | Show and focus the Capture view |
| Alt+V, T | Show and focus the Active Tools view |
Integrating SeqZap
This chapter describes how SeqZap can be integrated with the rest of your development infrastructure, such as continuous integration, build servers, etc.
SeqZap Command Line Interface
The first thing to cover is how to execute SeqZap tests from the command line.
After the tests have been developed using SeqZap Studio, they can be executed by the seqzap.exe command line executor which is included in the bin directory where SeqZap is installed.
When SeqZap is installed it automatically registers an environment variable called %SEQZAP_EXE% which is very useful to make your command line executions independent of where SeqZap has been installed, it also avoids any problem you might hit when going from a 32-bit Windows (where SeqZap is installed in C:\Program Files by default) to 64-bit Windows (where SeqZap is installed in C:\Program Files (x86) by default).
Basic operation
The command line interface requires at least two arguments: the script file to open and the procedure/test-case/test-suite to execute.
The script file can be both a single script file, and a .SeqZapProject file for a larger project, it is specified using the –f argument.
You can only execute one procedure/test-case/test-suite for each invocation of %SEQZAP_EXE% so you must use one of the following arguments:
- -p <procedure name>
- -s <test suite name>
- -c <test case name>
REM Start the Run procedure
%SEQZAP_EXE% -f MyScriptFile.szs –p Run
REM Start the Normal test suite
%SEQZAP_EXE% -f MyProject.SeqZapProject –s Normal
%SEQZAP_EXE% will return an exit-code of 0 if the test was started successfully, also if the test failed, this behavior can be changed using the --verdict-error flag.
Supported arguments and flags
%SEQZAP_EXE% differentiates between flags, which do not take an argument, and arguments, which do take an argument.
Flags
-v
--verbose
Instructs SeqZap to write the execution log of the test on the standard output console during execution.
-s
--silent
Instructs SeqZap to not write any output on the standard output console.
Normally %SEQZAP_EXE% will inform you about command line arguments it does not understand, or script files which could not be found, but with the silent flag %SEQZAP_EXE% will not output anything.
-vv
--extra-verbose
Be extra verbose, allow SeqZap to write startup and shutdown progress to the standard output console.
--verdict-error
Normally SeqZap will return 0, even if the execution did not result in a Pass or Unset verdict, but if this flag is set then SeqZap will return 2 if the test failed or resulted in an error.
--debug
Set SeqZap in DEBUG mode, this is equivalent to clicking the Debug -> Debug Mode menu item in SeqZap Studio.
DEBUG mode changes how much logging is done.
--dry-run
Only parse the script files and ensure that they can be executed if this switch is removed from the command line, that is perform a normal execution of SeqZap without executing any scripts.
--dry-run-parse-only
Force enable simulation on all ZapTools that support simulation and parse the script files. Thus, this operation will fail if any included scripts have a workbench containing ZapTools that do not support simulation and that cannot connect to the device that they are interfacing. That is, it is possible to execute this dry run test on scripts containing ZapTools that do not support simulation as long as they can access their target device, e.g. a “non-simulation” ZapTool that is daisy chained to a Serial ZapTool (which supports simulation), or of course if a required physical device is present when the dry run test is executed.
Hence, this parsing does not guarantee that all tool parameters are valid as this may not be possible to verify completely without access to the devices connected when the actual test execution takes place. However, except from that, this dry-run mode allows checking the SeqZap scripts for syntactic errors and invalid references without having access to the testbed on which the scripts eventually will be executed.
Enabling this switch will also allow execution of command line SeqZap without any of the -p, -s or -t options in order to allow execution of a parse-only dry run on e.g. utility scripts that do not contain any test cases or suites. Hence, the executed command line will not be valid when this command line option is removed again and none of the -p, -s or -t options are specified.
--wait
Wait for the user to hit a key before stopping the command line interface.
--ignore-multiple-configuration-properties
If the same configuration property is set multiple times on the command line (or in .SeqZapCmdFile files) SeqZap will normally report an error and execution will not start. By specifiying the --ignore-multiple-configuration-properties flag, multiple --set arguments for the same configuration property is allowed and the last specified value will be used.
--skip-unsatisfied
If the test-suite to execution contains test cases with unsatisfied preconditions, execution should start anyway, and the test cases with unsatisfied preconditions should be skipped.
--skip-missing-configuration-properties
Skip configuration properties set using the --set which are not found.
Otherwise %SEQZAP_EXE% will not start the test when a configuration property is not found.
If –skip-missing-configuration-properties is specified a message is written to the log and stdout for each configuration property which was not found.
--ui
--user-interface
%SEQZAP_EXE% will show a text-only user interface on the console while the execution is running.
--studio
%SEQZAP_EXE% will start SeqZap Studio with the exact same parameters as it was started with itself. SeqZap Studio handles the following command line arguments:
- -f/--file Open the given file.
- -s/--suite Set the given suite as default execution target (F5).
- -p/--procedure Set the given procedure as default execution target (F5).
- -c/--case Set the given test case as default execution target (F5).
- --partner Set the given partner as the partner for the default execution target (F5).
- --reference Add a reference the given script file to the file given with –f or --file.
- --set Will set the given configuration properties’ local value to the given value.
- --skip-missing-configuration-properties
- --ignore-multiple-configuration-properties
--print-sort-alphabetically
--print-system-files
--print-only-test-cases
--print-only-test-steps
Specifies how the printed Script Files should look, see the Printing section of the manual for more.
Arguments
-f <filename>
--file <filename>
Specify the script file to load, this can also be a SeqZap project file.
-l <filename>
--log <filename>
Append the execution log to the given filename.
-s <suite name>
--suite <suite name>
Select the test suite to run, if the test suite could not be found a list of the possible test suites are written to the standard output console.
-c <test case name>
--case <test case name>
Select the test case to run, if the test case could not be found, or if the found procedure is not a test case, a list of the possible test cases are written to the standard output console.
-p <procedure name>
--procedure <procedure name>
Select the procedure to run, if the procedure could not be found a list of the possible procedures are written to the standard output console.
--partner
Select the partner to execute the selected test through. The example below executes the All test suite using the UntilFail partner.
%SEQZAP_EXE% -f MyProject.SeqZapProject –s All –partner UntilFail
--reference <filename>
Add a temporary reference from the file given using the –f argument to the script file identifier by the given filename.
This reference will not be written to the script file, but will only exist temporarily during this SeqZap Command Line execution.
-r <report name>
--report <report name>
Tell SeqZap to generate the given report after execution has finished, the report will be written to the same directory as script file given using the –f argument and the filename will follow the following pattern:
Report <project name> <date> <time> <report name>.<report default file extension>
If the report name contain whitespace the report name has to be enclosed in ” (quotes)
%SEQZAP_EXE% -f MyScript.szs –r Run --report “Detailed Browsable Report”
--rf <report name>=<filename>
--reportfile <report name>=<filename>
Tell SeqZap to generate the given report just as using the –r argument, but do it to the filename specified after the equal sign in the argument.
There is no reason to use both arguments, since this argument will also tell SeqZap to generate the report.
As with the –r argument, the argument needs to be enclosed in “ (quotes) if it contains whitespace
%SEQZAP_EXE% -f MyScript.szs –r Run --rf “Detailed Browsable Report=report.html”
--set <name>=<value>
Specify the value of configuration properties or the input parameters to the procedure specified using –p.
The example below sets the value of the PortName configuration property defined on the project.
%SEQZAP_EXE% -f MyProject.SeqZapProject –s All –-set Project.PortName=COM1
If the same configuration property is specified multiple times SeqZap will report an error, and execution will not start. This behavior can be ignored by specifying the --ignore-multiple-configuration-properties flag.
--print <filename>
Print the script as an HTML file, see the Printing section of the manual for more.
Specifying the command line arguments in a file
Specifying arguments on the command line can sometimes be a bit tricky because the command line interpreter needs “ (quotes) around values.
To mitigate this problem %SEQZAP_EXE% support an argument called --cmdfile which takes a filename as argument.
%SEQZAP_EXE% will read each line of the given cmdfile as if it was specified on the commandline separated by whitespace, this makes it much easier to see where an argument starts and the other begins.
The cmdfile below loads the My Test Project With Spaces.SeqZapProject, starts the A Long Test test suite and generates the Detailed Browsable Report to the My Report.html file.
# A cmdfile also supports comments
-f
My Test Project With Spaces.SeqZapProject
-s
All
--reportfile
Detailed Browsable Report=My Report.html
All the flags and arguments supported on the command line are also supported in a cmdfile.
The only difference is that environment variables are not expanded in the cmdfile, so a filename such as %HOMEPATH%\Documents\MyProject.SeqZapProject will not work.
Integrating SeqZap with Jenkins
SeqZap integrates nicely with Jenkins, in fact, the team behind SeqZap use Jenkins with SeqZap for their system testing.
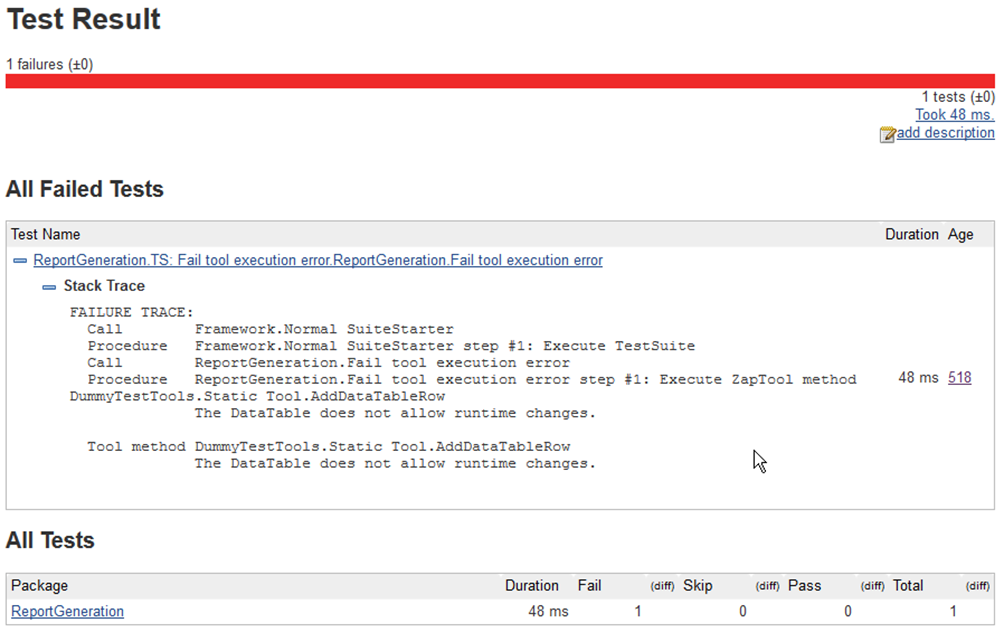
JUnit report
SeqZap’s JUnit report is fully compatible with Jenkins’s “Public JUnit test reports” action, all that is needed is to add it to the Post Build steps of a Jenkins job and specify the path to the generated JUnit report file.
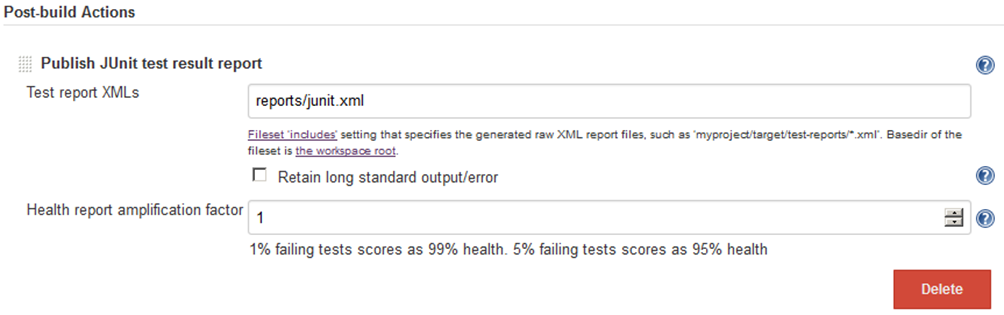
Adding this report to a Jenkins job allows Jenkins to determine how many test cases passed and failed, and which. Jenkins will also provide a stack-trace of the failed test cases.
Using --studio to debug scripts
Sometimes it is necessary to debug SeqZap scripts on the Jenkins node where the test is run, usually because a specific piece of test hardware is only available on that node.
It is of course possible to start SeqZap Studio manually and open the test project, but to make this process even easier SeqZap’s command line interface (%SEQZAP_EXE%) supports the --studio argument which will start SeqZap Studio with the exact same arguments as the original call to %SEQZAP_EXE%.
This is especially useful when script files are referenced on the command line using --reference or when configuration properties are set using --set.
Adding the --studio argument each time it is needed is cumbersome, so usually the Jenkins job is parameterized so SeqZap Studio can be started when needed:
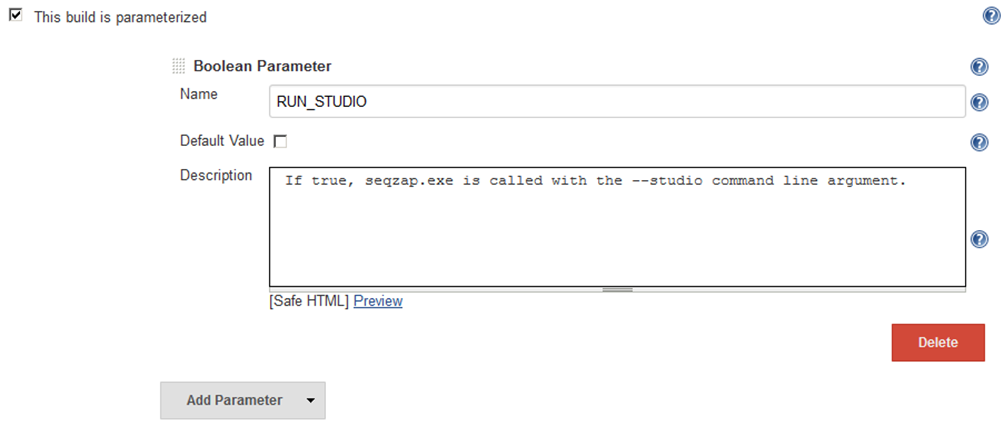
The command line argument to call SeqZap can then use this RUN_STUDIO environment variable to add --studio when needed:

Best Practice
This chapter describes some of the ways of using SeqZap that CIM Software Testing A/S and our customers have observed as beneficial.
Project Structure
This section describes a way to structure SeqZap files in a way that gives a nice level of flexibility and allows re-use and mixing as much as possible to avoid duplicating test cases, workbenches or libraries of utility procedures.
Desired project structure
The project structure described will have the following properties:
Be able to re-use Test Cases between different products
Test cases written for one product should be re-usable for products which implement the same functionality without modifying the test case itself.
Be able to re-use Workbenches between projects
The workbench containing a Modbus connection to the Controller should be able to be re-used between the different generations of the Controller.
Be able to re-use a library of general Procedures
Besides re-using the test cases it should also be possible to re-use utility procedures which perform common tasks, for example a procedure which reboots the target and waits for it to finish starting up.
Be able to configure the Workbenches when running using the SeqZap command line interface
We would, of course, like to run our tests automatically as often as possible, so we want to be able to set configuration parameters, for example to select the serial port to use, on the command line.
Bonus features by using this project structure
Be able to open and use a workbench without having to open a project
To make it as easy as possible to use SeqZap as during development, it is important that connecting to a target to read a few values using a workbench is as easy as possible.
So a desired outcome is that a workbench should be usable without having to create a project.
Be able to open and run procedures in libraries without having to open a project
It is also possible to run utility procedures from libraries without having to open a project file.
Overview of project structure
What we would like to end up with is a structure like the following:
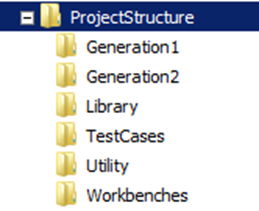
- Generation1 and Generation2 contain the SeqZap project files for each generation of the Controller.
They might also contain test cases which are specific for that generation of the Controller.
- Library contains common script files which work independently of projects, the scripts files in this folder should only reference other Library files and maybe workbench files.
- TestCases contain general test cases which can work both for Generation1 and Generation2 of the controller, it might also contain test cases for the Windows Utility which target both Generation1 and Generation2.
- Utility contains the test projects which tests the Windows Utility.
- Workbenches contains script files which only contain a single workbench item.
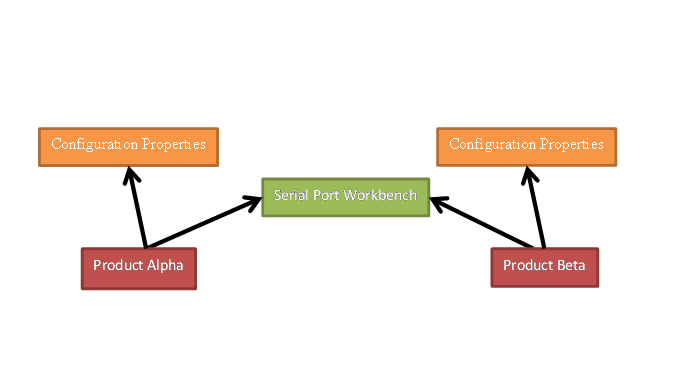
It is better illustrated with an example, lets say that we have two test cases, one (Test Case 1) which works for both Generation1 and Generation2 and another (Test Case 2) which only works for Generation2.
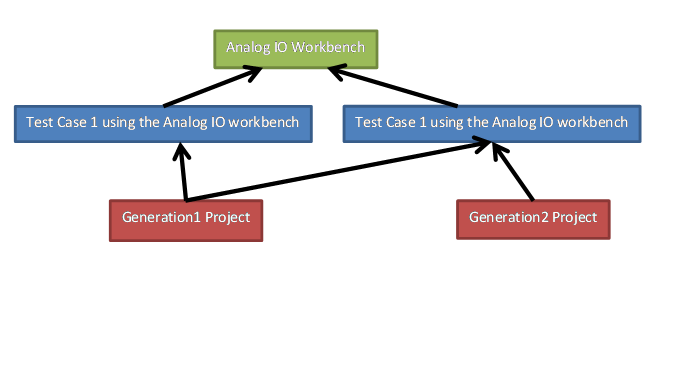
Both the test cases refer to the Analog IO workbench file, but they have no knowledge of each-other.
The projects only refer to the Test Cases, so the projects are
Sharing a workbench between products
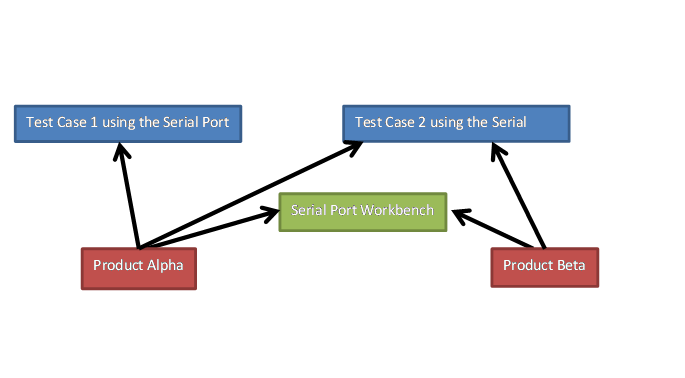
One way to share a workbench between products would be to simple add a reference to the workbench for each test case which use the relevant workbench, this makes the test case completely independent of the product and means that it can be executed without worrying about also opening the correct workbenches.
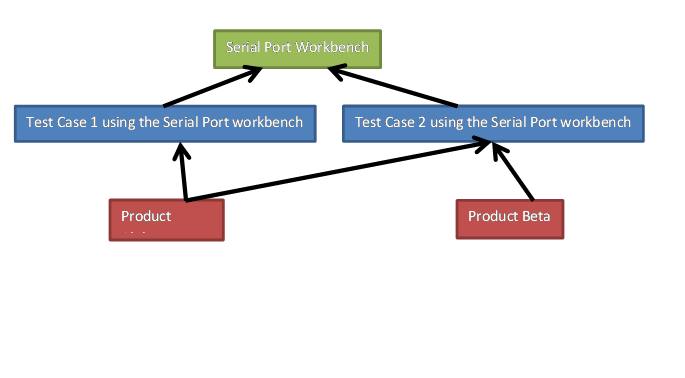
In the example above both the Alpha and Beta product uses Test Case 2, but only the Alpha product use Test Case 1. Both test cases use the Serial Port workbench.
An easier way to do it is to let it be up to the projects to reference the correct workbenches for that particular product.
Sharing configuration properties
Configuration properties can defined both in the product definition or in a separate file.
Configuration Properties are grouped in named collections to make it easier to group related configuration properties.
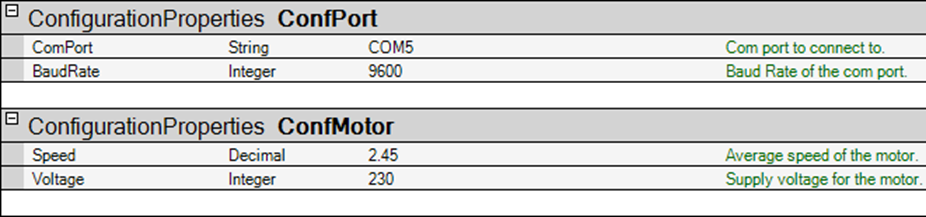
In the example above the properties relating to the serial port are grouped in the ‘ConfPort’ collection and properties relating to the motor are grouped in the ‘ConfMotor’ collection.
Putting configuration properties in separate files are recommended when using SeqZap since it makes it easier to adapt to future changes in project structure.
Directly referencing the configuration properties
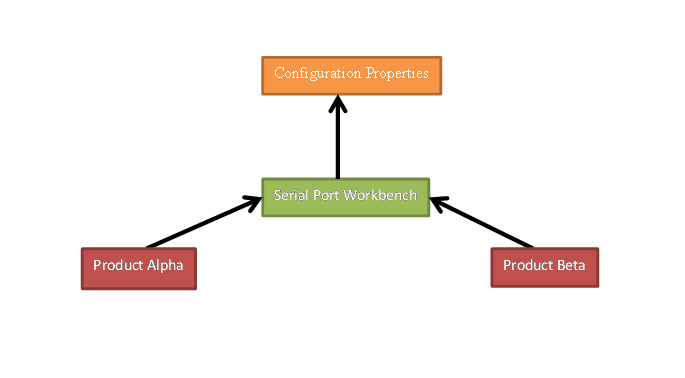
In this scenario it is not possible for Alpha and Beta to have separate serial port configuration properties, it is possible for each user to change the configuration properties (saved in the .usersettings file).
Configuration properties can always be changed when using SeqZap on the command line.
Indirectly referencing the configuration properties
Appendix
3. Party components used in SeqZap
SeqZap uses several 3. Party components, this appendix contains an exhaustive list the components and their licenses.
| Component | License |
|---|---|
| Actipro Software Syntax Editor | Commercial |
| Antlr3 | BSD License (http://www.antlr3.org/license.html) |
| BindingListView | BSD License (http://sourceforge.net/projects/blw/) |
| BMC AD4 driver | Commercial |
| DotNetMagic | Commercial |
| DotNetZip | Microsoft Public License (http://dotnetzip.codeplex.com/license) |
| EPPlus | GNU LGPL (http://epplus.codeplex.com/license) |
| GsmComm | Free to use (http://www.scampers.org/steve/sms/libraries.htm#gsmcomm) |
| LibEdward | Apache 2.0 License (https://github.com/rasmus-toftdahl-olesen/EdwardScissorhands/blob/master/COPYING.txt) |
| Log4net | Apache 2.0 License (http://logging.apache.org/log4net/license.html) |
| LumenWorks.Framework.IO | MIT License (http://www.codeproject.com/Articles/9258/A-Fast-CSV-Reader) |
| MailSystem.NET | GNU LGPL (http://mailsystem.codeplex.com/license) |
| National Instruments DAQmx | Commercial (only Runtime DLL) |
| NewtonSoft JSON | MIT License (http://json.codeplex.com/license) |
| NModBus | MIT License (http://code.google.com/p/nmodbus/) |
| Npgsql | BSD License (http://npgsql.projects.pgfoundry.org/license.html) |
| Nunit | Nunit license (zlib/libong style) (http://nunit.org/index.php?p=license&r=2.6.2) |
| NVelocity | Apache 1.1 License (http://sourceforge.net/p/nvelocity/code/HEAD/tree/LICENSE.txt) |
| Renci.SshNet | New BSD License (https://sshnet.codeplex.com/license) |
| Sanford.Multimedia | MIT License (http://www.codeproject.com/Articles/6228/C-MIDI-Toolkit) |
| Selenium | Apache 2.0 License (http://www.seleniumhq.org/about/license.jsp) |
| System.Data.SQLite | Public Domain (http://www.sqlite.org/copyright.html) |
| VncSharp | GNU GPL (http://cdot.senecac.on.ca/projects/vncsharp/) |
| Ini-parser | MIT License (https://github.com/rickyah/ini-parser/blob/master/LICENSE) |
Reporting errors in SeqZap
This section describes how to report errors found in SeqZap to CIM A/S.
Describing the error
- Is it reproducible?
- Can it be reproduced by CIM Software Testing A/S
- Please note that CIM Software Testing A/S might not be in possession of the same hardware and tool specific configuration files which reproduce the error.
- The fewer number of steps CIM Software Testing A/S needs to perform to reproduce the error, the quicker the error can be identified and fixed.
- Does the error occur during execution or during script editing?
- If during execution
- Running a Single Procedure or Test Suite?
- Can the script producing the error be reduced?
- Remove unused workbenches
- Remove unused files
- Remove unused procedures
- If during editing?
- Does it happen consistently?
- Which user actions are required to reproduce it?
- How is the mouse used?
- How is the keyboard used?
How is SeqZap running
- SeqZap Version
- Operating system version?
- Running as administrator?
- Running as SeqZap Studio or SeqZap Command Line?
- What is the name of the computer on which the error is produced?
- CIM Software Testing A/S can use this information to find the failure reports related to this computer.
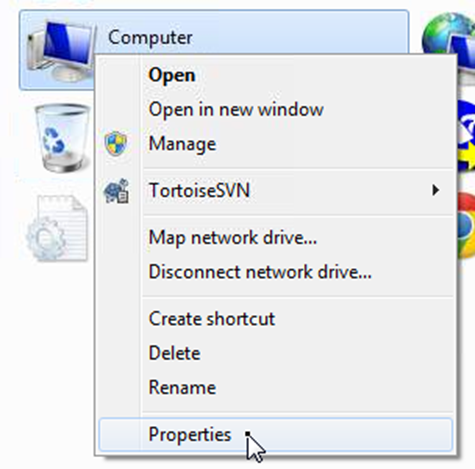
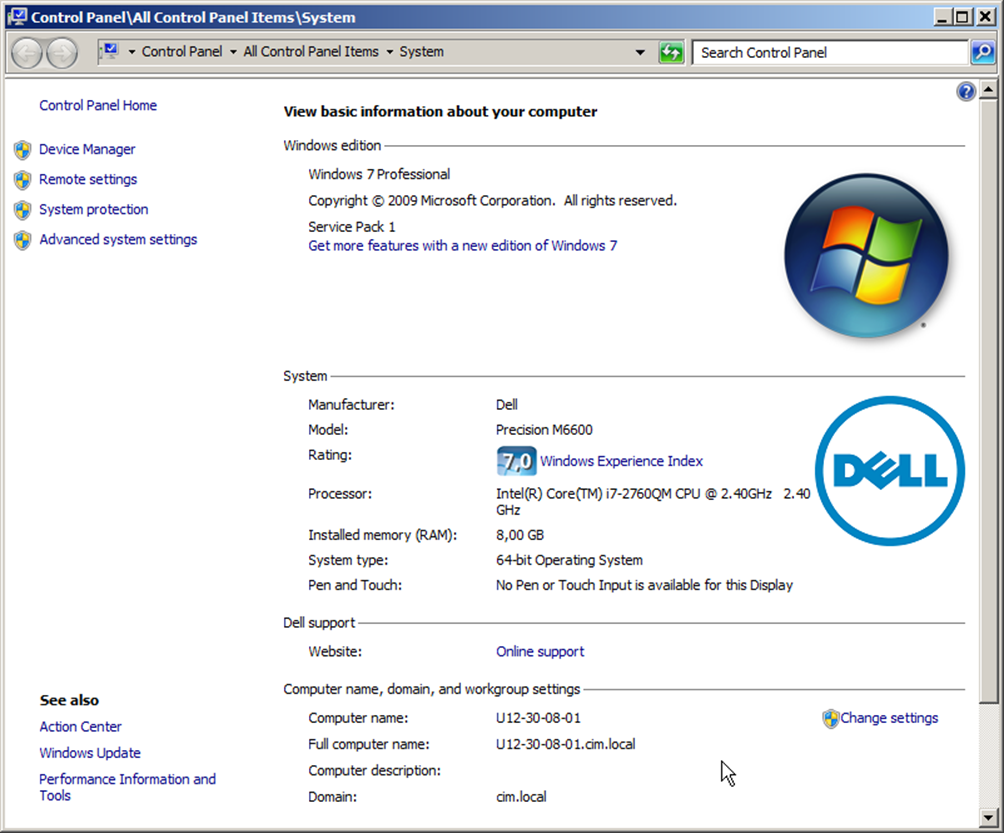
Most of this information can be found in the System dialog, which can be shown by Right-clicking the Computer icon and selecting Properties:
This will show the System control panel dialog:
Data to collect
- Screenshots
- Internal Logs
- Execution Log
- Failure reports
Screenshots
In all cases it is useful for CIM Software Testing A/S to have a screenshot when the error happens, preferably also a screenshot before the error happens.
Internal Logs
The SeqZap logs directory contains internal logs related to SeqZap.
%USERPROFILE%\AppData\Local\Sequanto\SeqZap\logs
Because SeqZap appends to the log-files, it can become hard to find where the current log starts and other logs end, to make sure that only logs related to the error is included, please do the following:
- Close SeqZap
- Delete all files in %USERPROFILE%\AppData\Local\Sequanto\SeqZap\logs
- Start SeqZap
- Reproduce error
- Send a zipped version of the log files
This will make sure that only the, hopefully, few log lines related to the error is included.
Execution Log
If the error happens during execution, please make sure that the execution log is included in the failure report – if the error also happens when an HTML report is generated, please also include that report.
Failure Reports
First, clear all the existing failure reports so it can be detected whether producing the error results in failures being reported by doing one of the following options:
- Send failure reports by clicking the “Report Failures” button in the Maintenance toolbar, if it is shown:
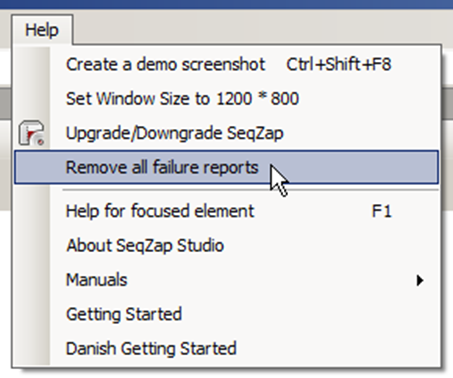
- Use the SeqZap Studio’s Help -> Remove all failure reports menu item to remove all the failure reports without sending them:

Then the error should be reproduced, if the “Report Failures” button is shown it means that reproducing the error produces a failure report, normally this makes it much easier for CIM Software Testing A/S to fix the error.
If the error results in a failure report, please press the “Report Failures” button and report the error to CIM Software Testing A/S, be sure to include the name of your machine to make it easy for us to find the failure report.
Known Issues
This section covers known issues in SeqZap, and how they can be mitigated.
Currently no known issues exist in SeqZap.